A Guide to npm: The Node.js Package Manager
Published on 27 February 17
 Michelle
0
1
BY MARTIN GOUWS
JavaScript is easily the most used language when it comes to the development of websites and web applications. The multitude of resources are astounding, and even moreso, the number of libraries available.
At first, these libraries are few and easy to maintain; however, soon enough dependency hell sets in and a more mature solution is required.
Enter the Node Package Manager (
You can get started by simply npm install <package name>
Want to install a specific version? No problem. Run npm install <package name>@1.2.3.
Want to install a package globally (like Mocha, or Angular-CLI)? Just add a -g like npm install -g angular-cli mocha
5
CLI Commands
The CLI is where users spend most of their time interacting with
Querying help (npm help) spews out an entire array of options, and npm help-search <searchText>
3
install: It’s mentioned here because of its sheer necessity when working withnpm . Used to either install a new package locally or globally (when adding-g) or to install dependencies listed inthe package.jsonfile (more on that later).uninstall: This is also an essential. It’s used to purge a specific package fromthe node_modulesdirectory either locally or globally (when adding-g).access: This is the playground ofnpm user permission administrators within the contextnpm -organizations andscoped (private) packages. Seriously powerful stuff. Used in conjunctionwith adduser, owner, team, etc, it gives fine grained control over who has access to what.bin: Where on earth are packages installed? Run this command to see the absolute file path.cache: If you start installing packages fromnpm left, right, and center, this command is quite useful. Either call it withthe lssubcommand to see a list of locally cached packages or withthe cleansubcommand to clear all packages that are in the cache. Back when thenpm registry was still a bit unstable, this was essential to get back to a stable environment or to reset things when you didn’t properly set upnpm permissions.config: We will get into the different configuration options later, but this command deals primarily with persisting configuration properties in the local or global configuration file by usingthe set, getor deletesubcommands .dedupeor ddp: When working on a project over an extensive period of time and installing packages straight fromnpm , this command will walk the local package tree and attempt to simplify dependencies.link: When you are developing your ownnpm package, this allows you to create a symlink to the global context so it can be tested as if it was installed globally from thenpm registry. For example, if you are writing an assembly tool innode that has a CLI installed globally, you can run this command and test your CLI’s behavior without needing to deploy it first.ls: It’s used to visualize package dependencies and their dependencies, in a tree structure. It’s cool to see and is also useful for comparisons with other projects.outdated: This is used to evaluate the current state of installed dependencies and whether or not they are outdated. In projects where the root dependency list is hundreds of lines long, a manual check on packages is close to impossible.Adding -g --depth=0to this command allows you to also check your globally installed packages.publish: This command is essential when developing your own package fornpm . It does exactly as the name suggests; it publishes your package to thenpm registry.search: Use this to search the registry for all packages containing the text provided in the third argument.shrinkwrap: In short, this commands allows you to lock down specific dependency versions in a package inorder, so that a relaxedsemver (semantic versioning) number doesn’t break production code.star: Do you really like a package you are using? Use this command to show your appreciation directly from the terminal, which then reflects on the package’s page on thenpm registry.update: This usually followsthe outdatedcommand to update any outdated packages.version: This gives you a shorthand to bumpthe package.jsonversion property, and do a git tag all in one.
29
Note that most of these commands can take subcommands and/or configurations, and this list is by no means an end-all discussion on the CLI.
npm-config
Configuration is a major part of npm , and there are multiple ways configuration variables can be set.
1
Configuration via CLI and Environmental Variables
First,
Typically it would look something like npm <command> --<configuration option> [<optional value>]
If the value is not specified, the option will be set to true by default.
For example, let’s say that you are working on a scoped (private)
This is easily done by --access=publicpublish
Configuration appended to other commands like this does not persist everywhere, so it can become tiresome to set an array of configurations via the CLI.
In those cases, it may be better to set configuration using environmental variables.
Any environmental variable set with npm_config_
For example: export npm_config_registry=localhost:4321 would set the registry configuration option globally, and when
9
Configuration via the npmrc file
1
You can also set configuration options using the special .npmrc file, which can be set at different levels depending on your requirements:
- Project level: In the root of a project’s code along with its
package.jsonfile, typicallypath/to/project/.npmrc - User level: The directory that configures a specific user’s account, typically
~/.npmrc - Global level: The directory where
npm looks for global configurations, typically$PREFIX/etc/npmrc - Built-in level: Be cautious. This configuration is not only global but it is also part of the
npm source code, and best practice recommends (actually demands) that we do not change code we are not responsible for maintaining. It can typically be foundat /path/to/npm/npmrc.
3
Configuration settings in the .npmrc file can be modified and persisted using the CLI by running a command in this format: npm config set <key> <value>.
For example, you can run npm config set access public to make the publishing configuration of a scoped (private) package persistently public.
By default, this command would persist the configuration locally (the user level configuration as described above), but you can add -g to persist it globally.
.npmrc file must be modified using a text editor. Configuration via package.json
Finally, configuration can be set from the
package.json file. However, this is seldom used (and should only be used if explicitly required), because a project level .npmrc file is the conventionally prefered place to set package configuration. Notable Configuration Settings
access: As discussed above, it’s used to set permissions.always-auth: It’s important to note that this setting defaults to false. When it is set to true,npm will always require authentication when contacting the registry.ca: Defaults to thenpm certificate authority (CA). It can be changed to null to allow access to only known registrars, or to a specific CA certificate to only grant access to that specific one. This setting, alongwith cafile, certand strict-ssl, are seldom used, but speak toward the security and reliability aspect ofnpm , allowing peace of mind in knowing that the package you are installing is coming from the source you expect.color: This defaults to true, giving you a break from the standard bleakness of the terminal by coloringthe stdoutthat is allowed bytty file descriptors. If set to false the terminal remains dull. When it is setto always, it always outputs in color.depth: This setting allows for granular control over what you see with recursive commands, such aslsand outdated, by assigning how deeply they’re executed. A value of 0 will only evaluate the first level of dependencies whereas infinity (the default) will cause all levels of dependencies to be evaluated. The exception to this rule is when using itwith outdated; in that case, infinity is interpreted as 0 to ensure more relevant output.dev: This is set to false by default, but when it is set to true (when doing annpm install) all development dependencies inthe package.jsonfile will be installed along with the normal dependencies.dry-run: When this setting is set to true,npm will not make any changes to your package but will instead tell you what it would have done. This can be very useful when running certain commands, suchas dedupeor update. git-tag-version: It is set to true by default. This setting tags a version in git when runningthe npm versioncommand . If you are usingnpm as the package manager for a large project that has tagged versions in git, it can save you time, and remember to updatethe package.jsonfile for you.loglevel: By default, this is setto warn, which gives an error and warning output when runningnpm commands. Other settingsinclude silent, which provides nooutput; error, which only logs errors to theoutput; http, which only announceshttp requesterrors; info, for want informativeoutput); verbose, which logs almost everything;and silly, which, like the name suggests, gives a silly amount of output and then some.production: When this is set to true,npm acts accordingly and runs all commands in production mode. This means that development or optional dependencies will not be installed, nor will any development related tasks be executed.rollback: Whenset to true, all failed installs are removed. This comes in handy when an installation of dependencies fail. Depending on your level of logging, you should be able to see what installations failed, make a note of these, and runthe npm installcommand with the rollback option set to true. Then with your notes and a dry-run installation (as described above), you can then debug the problem.save
: When installing a package directly from the registry, you can append–saveto the command which will add the installed package to the dependencies option in thepackage.jsonfile. For example,npm installlodash ` will addlodash to your dependencies.save-dev: Similar to the save configuration option,add --save-devwhen installing a package, and it will then be added to the devDependencies option inthe package.jsonfile .save-optional: Similar to the save configuration option,add --save-optionalwhen installing a package, and it will then be added to the optionalDependencies option inthe package.jsonfile .save-exact: When installing packages,the save, save-devand save-optionaloptions modifythe package.jsonfile by inserting the installed package into its respective property with asemver range operator. When invoking the ‘save-exact’ configuration setting with a value of true, in conjunction with one of the mentioned settings above, a specific version number is used, ignoring thesemver range.save-prefix: This sets thesemver range operator whenusing save, save-devor save-optional. The defaultis ^, allowing for minor upgrades on packages to happen on install. This can be set to any valid prefixedsemver range operator.tag-version-prefix: The conventional defaultis v, specifying what is prepended to the git tag version whenrunning npm version.
47
Updating npm Using npm
You can also use
Simply npm install -g npm@latest
At the end of the day, my recommendation is to stick with the pairing as they are intended.
When using6
The package.json File
The package.json file is the crucial element that links everything together.
It’s a requirement for publishing a package to the npm registry, and it’s where the management part of dependencies comes to life.
It has two required fields, namely name and version, and together these properties should be a unique identifier.
The name field should adhere to certain rules, as defined by the npm documentation on naming, and the version field is subject to the semver specificiations.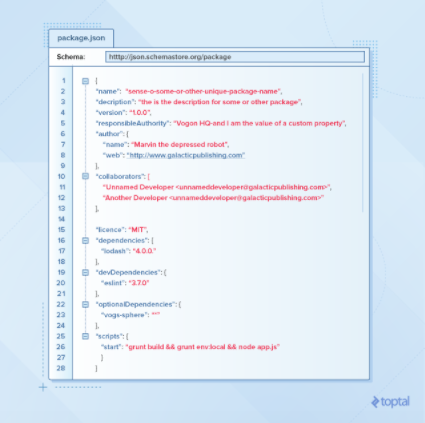
Over and above that, you can have a list of dependencies a mile long, and define a specific version to be used for each of them, using the semver versions and range operators. Here’s a list of other notable properties.
"main"
main defines the entry point to your application, which defaults to . Depending on convention or your framework, it might be or . You can, of course, make it anything you want.
index.jsapp.jsmain.js3
"scripts"
This is an underrated property.
First, it can be used to do things on
2
"dependencies"
This property is a list of packages needed by your application, along with the compatible
This is done by adding --save (or the shorthand -S) at the end of npm install
When you do this, the newly install package(s) gets added to the list of dependencies in package.json
--savenpm uninstall
It is important to be aware of the
If the
9
"devDependencies"
Separate from the dependencies property, the devDependencies property allows you to define dependencies that are only used during the development phase and are not required for the production build (like ESLint, grunt-contrib packages, and Protractor). Just as with dependencies, this property can be modified from the terminal by adding the command or the command . The same caution applies to versioning as mentioned under dependencies.
--save-dev (or the shorthand -D) to the end of npm installnpm uninstall3
"bin"
This is where you can specify your package’s executable file(s), like the path to a CLI utility. This property tells npm to create local or global symlinks to your executables when your package is installed.
"config"
As discussed earlier, this is where you define configuration settings though your file .
package.json2
"private"
When set to true,
This should not be confused with the access configuration setting.
This is a handy setting when you have a project that utilizes package.json
5
Custom Properties
package.json1
Developing Your Own npm Package
The
Chances are that, at some point, you too will want to develop your own package to share.
First, you need to author a package.json file with the minimum required properties of name and version, and then the main property to specify the entry point, for
Write your code in that index.js file,
Packages can be public or private.
Public packages are free to publish and are available for everyone to utilize.
Private packages, called scoped packages, can only be published if you paid private modules user, and they can be identified by the @username/
Scoped packages can also be published publically by calling publish--access=public
Furthermore, if you spend some more time expanding and improving your package’s code base, and it is time for a new version to be published, you simply alter the version (as per the package.jsonnpm publish
npm version <update_type>patchminormajorpackage.json17
npm Organizations
Again, the
What can be said about organizations in the
2
The Power of npm
Ultimately the documentation that
As with all things, strong opinions exist and many faults can be found. But if you have never tried
5

https://www.toptal.com/javascript/a-guide-to-npm-the-node-package-manager
In this article, Toptal Software Engineer Martin Gouws explains advanced features of the Node Package Manager that should be in every JavaScript developer's knowledge base.
This blog is listed under
Development & Implementations
Community
Related Posts:
Post a Comment
You may also be interested in
Share your perspective

Share your achievement or new finding or bring a new tech idea to life. Your IT community is waiting!