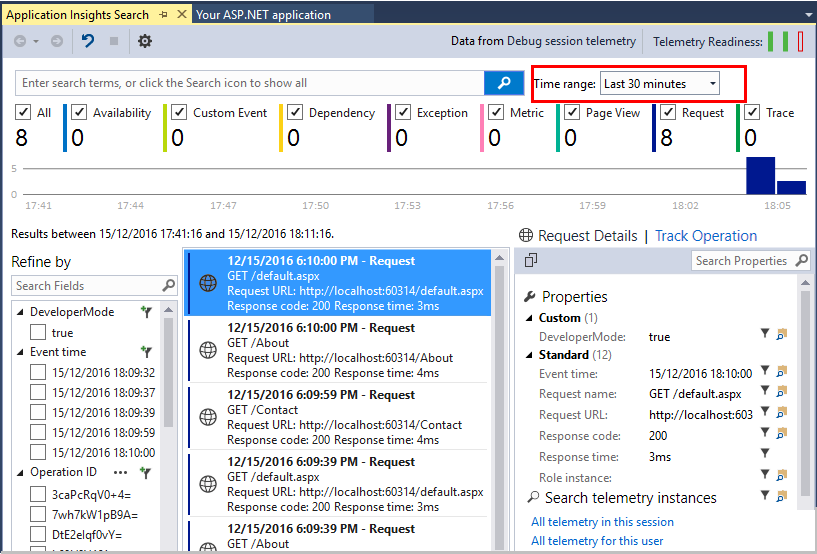
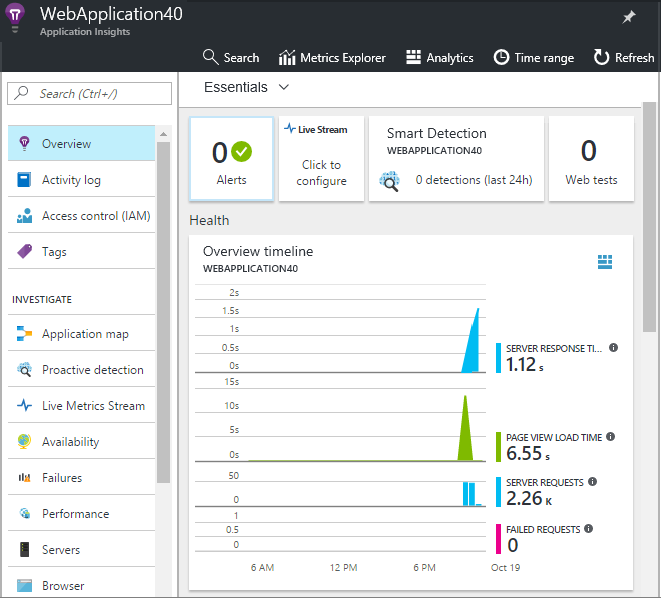
A Quick Guide to Set Up Application Insights for ASP.NET
Published on 23 February 17
0
1
Application Insights is an extensible Application Performance Management (APM) service for web developers. It monitors the performance and usage of your live web applications. It will automatically diagnose performance anomalies. With its powerful analytics you can detect issues/bugs and understand what users actually do with your app.
You will need:
- Visual Studio 2013 update 3 or later versions work better
- An Azure subscription
- Sign in to your Microsoft account which you might have for Windows, Xbox Live or other Microsoft cloud services, if your team or organization has an Azure subscription, the owner can add you
#1 - Add Application Insights SDK
When creating a new project, ensure that Applications Insights is selected in Visual Studio.
For existing projects:
You can right-click the project in Solution Explorer, and select Add Application Insights Telemetry or Configure Application Insights. #2 - Run your app:
Now run your application with F5 and try this out: open different pages to generate some telemetry. This will display a count of the events that have been logged in Visual Studio
#3 - View telemetry:
Click open the Application Insights window in Visual Studio: Either click the Application Insights button, or right-click your project in Solution Explorer: This view ('Data from debug session') shows telemetry generated in the server side of your app. Try out the filters, and click on any event to see more details. If there is no data, make sure the time range is correct, and click the Search icon.
In the portal
You can also see the telemetry at the Applications Insights web portal, unless you chose Install SDK only. The portal has the benefit of more in-depth analysis in terms of more charts, analytic tools, and dashboards than Visual Studio.
More detail in the portal
Live Stream Metrics shows the application metrics with almost real time latency. You can monitor the live data for your application including incoming request, outgoing request and server health. Open the Application Insight Portal for the application, and then you will have the option to select Live Stream. You have to access Live Stream at the same time as your app – to allow them to connect. Live Stream only shows telemetry for the minute after it is sent. Make use of options like Search, Metrics Explorer, and Analytics for more historical analysis. Data may take a few minutes to populate in these places.
#4 - Publish your app:
You can publish your app to your IIS server or to Azure. View the Live Metrics Stream to make sure everything is working well. Telemetry will begin to build up in the AI portal and you can now monitor metrics, search your telemetry, and set up dashboards. You'll see your telemetry building up in the Application Insights portal, where you can monitor metrics, search your telemetry, and set up dashboards. Also use the powerful Analytics query language to analyze usage and performance or find specific events. You can also continue to analyze your telemetry in Visual Studio with tools such as diagnostic search and trends.
Setting up Application Insights is relatively simple and it helps developers and organizations to monitor their application performance without relying on third party feedback. In order to build successful apps, you need to measure the performance, detect, diagnose and resolve the issues as they happen. Have you leveraged the benefits of Application Insights yet? Please share your views in the comments section below.
This blog is listed under
Development & Implementations
and Networks & IT Infrastructure
Community
Related Posts:
Post a Comment
You may also be interested in
Share your perspective
Share your achievement or new finding or bring a new tech idea to life. Your IT community is waiting!