Magento 2 Tutorial: Building a Complete Module
Published on 02 April 17
 Michelle
0
1
Magento is currently the largest open-source eCommerce platform in the world. Due to its feature rich and extensible code base, merchants with large and small operations all around the world have been using it for a wide variety of projects.
Magento 1 has been around for eight years, and its successor, Magento 2, was released at the end of 2015, improving weak points of the earlier version such as:
- Improved performance
- Official automated test suite
- Better back-end UI
- New, more modern front-end codebase
- A more modular way to develop modules, with files contained inside the Magento code instead of being scattered all over the place
- Reduced number of conflicts between modules trying to customize the same functionality

A little over one year down the
- Unit and integration tests, including an official and documented way to create them for custom modules
- Modules that are really modularized, having all of their files placed under one single directory
- A richer templating system, allowing the theme developer to create an n-level template hierarchy
- A series of useful design patterns adopted throughout the code, improving the code quality and decreasing probability of errors created by modules—These include automatic dependency injection, service contracts, repositories, and factories, to name a few.
- Native integration to Varnish as a full page caching system, as well as Redis for session and cache handling
- PHP 7 support
2
Prerequisites
It is important that you have a good understanding of the following technologies/concepts in order to follow the rest of this article:
- Object-oriented Programming (OOP)
- PHP
- Namespaces
- MySQL
- Basic bash usage
From all of the above, OOP is probably the most important one. Magento was initially created by a team of experienced Java developers, and their legacy can certainly be seen throughout the codebase. In case you are not very confident about your OOP skills, it might be a good idea to review it before beginning your work with the platform.
Overview of Magneto 2's Architecture
Magento’s architecture was designed with the intent of making the source code as modularized and extensible as possible. The end goal of that approach is to allow it to be easily adapted and customized according to each project’s needs.
Customizing
Magento 2 is a Model View ViewModel (MVVM) system. While being closely related to its sibling Model View Controller (MVC), an MVVM architecture provides a more robust separation between the Model and the View layers. Below is an explanation of each of the layers of
- The Model holds the business logic of the application, and depends on an associated class—the ResourceModel—for database access. Models rely on service contracts to expose their functionality to the other layers of the application.
- The View is the structure and layout of what a user sees on a screen - the actual HTML. This is achieved in the
PHTML files distributed with modules.PHTML files are associated to each ViewModel in the Layout XML files, which would be referred to as binders in the MVVM dialect. The layout files might also assign JavaScript files to be usedin the final page. - The ViewModel interacts with the Model layer, exposing only the necessary information to the View layer. In Magento 2, this is handled by the module’s Block classes. Note that this was usually part of the Controller role of an MVC system. On MVVM, the controller is only responsible for handling the user flow, meaning that it receives requests and either tells the system to render a view or to redirect the user to another route.
5

A Magento 2 module
1
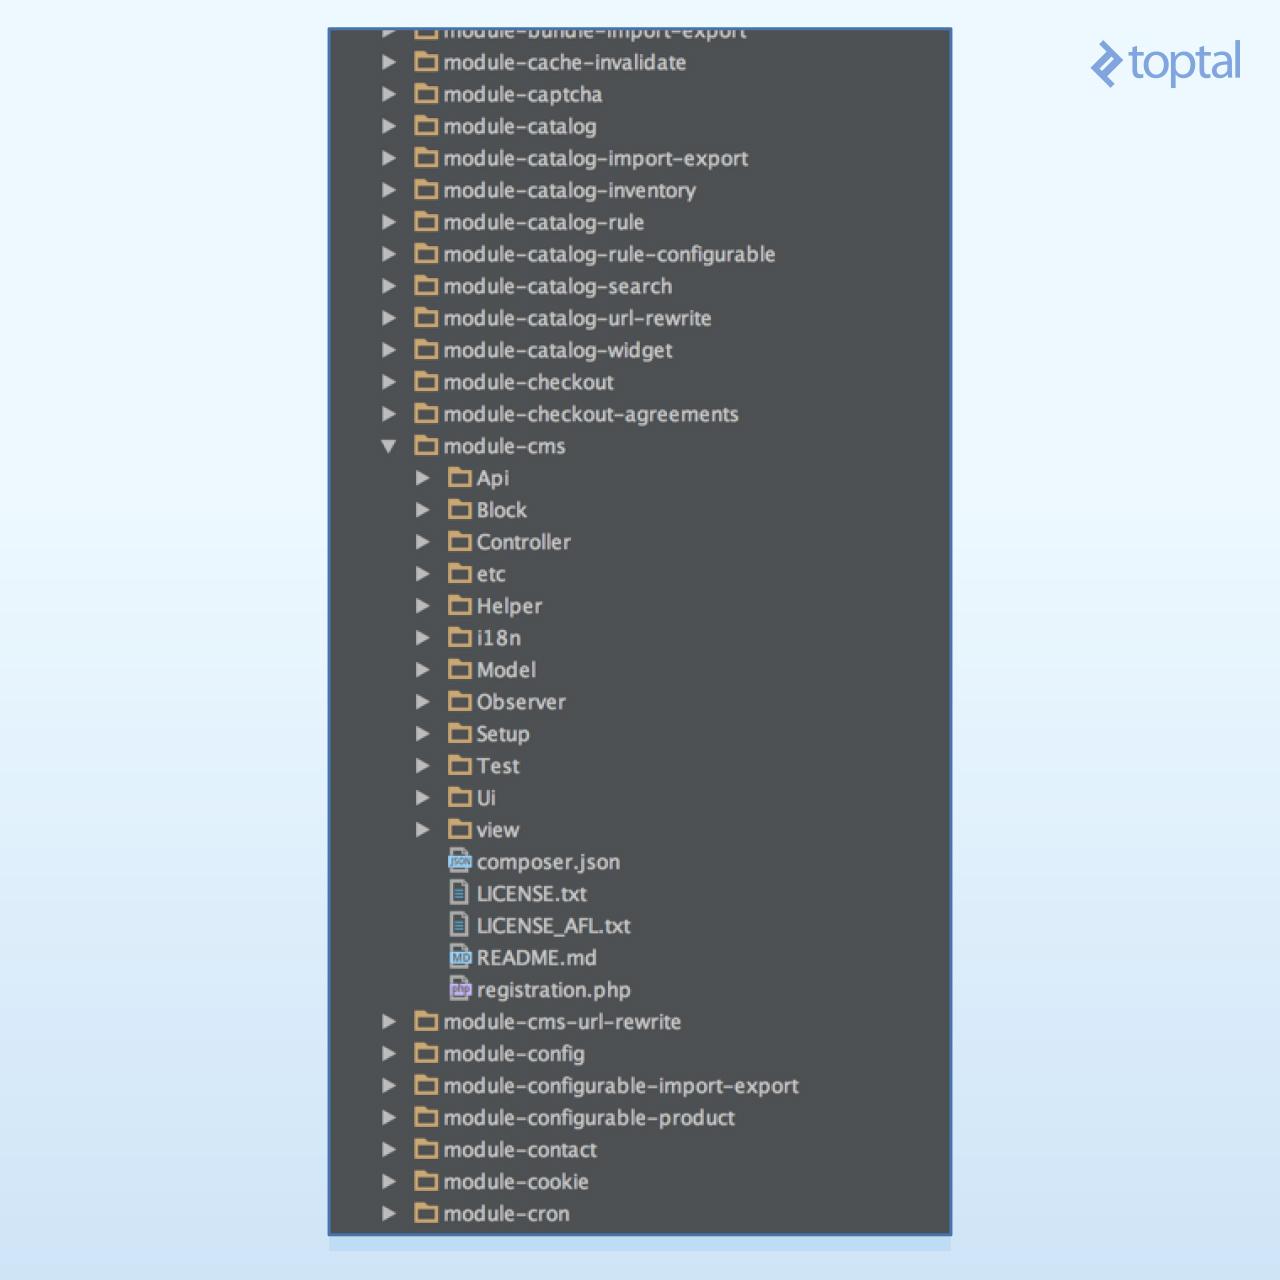
Each folder holds one part of the architecture, as follows:
Api : Service contracts, defining service interfaces and data interfaces- Block: The ViewModels of our MVVM architecture
- Controller: Controllers, responsible for handling the user’s flow while interacting with the system
- etc: Configuration XML files—The module defines itself and its parts (routes, models, blocks, observers, and
cron jobs) within this folder. The etc files can also be used by non-core modules to override the functionality of core modules. - Helper: Helper classes that hold code used in more than one application layer. For example, in the Cms module, helper classes are responsible for preparing HTML for presentation to the browser.
- i18n: Holds internationalization CSV files, used for translation
- Model: For Models and ResourceModels
- Observer: Holds Observers, or Models which are observing system events. Usually, when such an event is fired, the observer instantiates a Model to handle the necessary business logic for such an event.
- Setup: Migration classes, responsible for schema and data creation
- Test: Unit tests
Ui : UI elements such as grids and forms used in the admin application- view: Layout (XML) files and template (
PHTML ) files for the front-end and admin application
It is also interesting to notice that, in practice, all of Magento 2’s inner workings live inside a module. In the image above, you can see, for Magento_CheckoutMagento_Catalog
6
Setting up the Development Environment
At the time of this writing, we were able to use the official Magento 2 DevBox, which is a Magento 2 Docker container. Docker on macOS is something I still consider to be unusable, at least with a system which heavily depends on fast disk I/O such as Magento 2. So, we will do it the traditional way: Install all packages natively on our own machine.
1
Setting up the Server
Installing everything surely is a bit more tedious, but the end result will be a lightning-fast development environment. Believe me, you will save hours of work by not depending on Docker for your Magento 2 development.
This tutorial assumes an environment on1
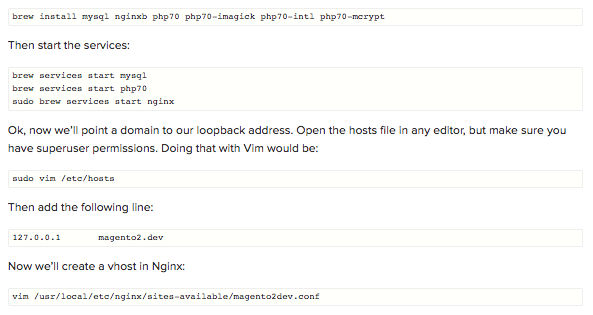


If you haven’t dealt with Nginx before, this file might scare you, so let us explain the little bits here, as it will also shed some light on some of Magento’s inner workings. The first lines simply tell Nginx that we are using the default HTTP port, and our domain is
magento2.dev: 1
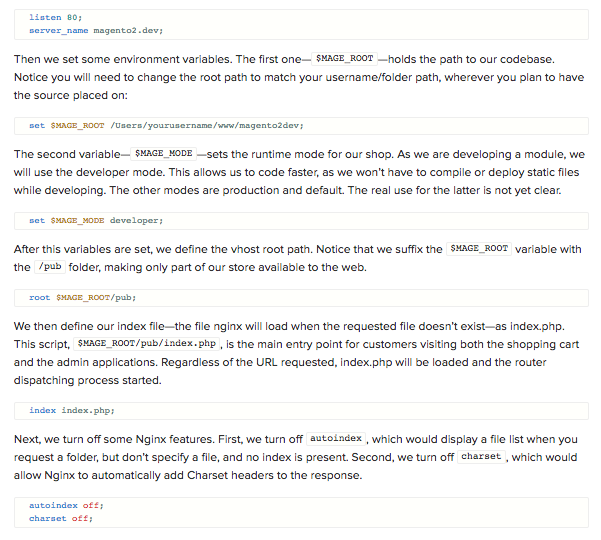
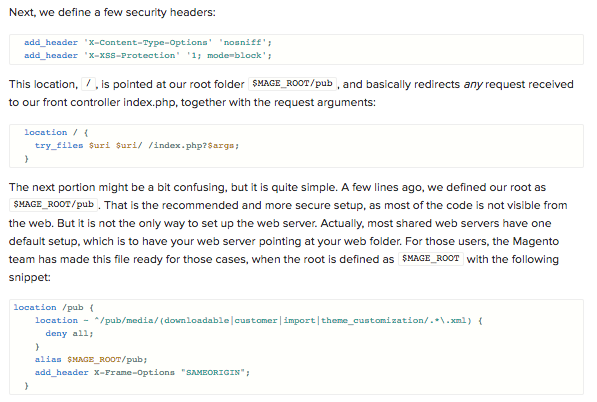
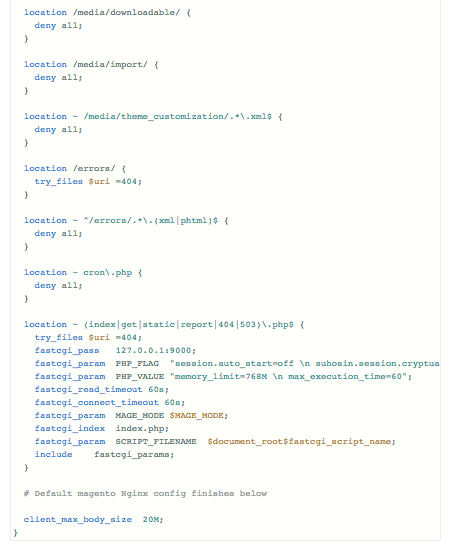
Keep in mind that, whenever possible, it is best if you have your web server pointing at $MAGE_ROOT/pub
$MAGE_ROOT/pub/static$MAGE_ROOT/pub/static.php4


Installing Magneto 2
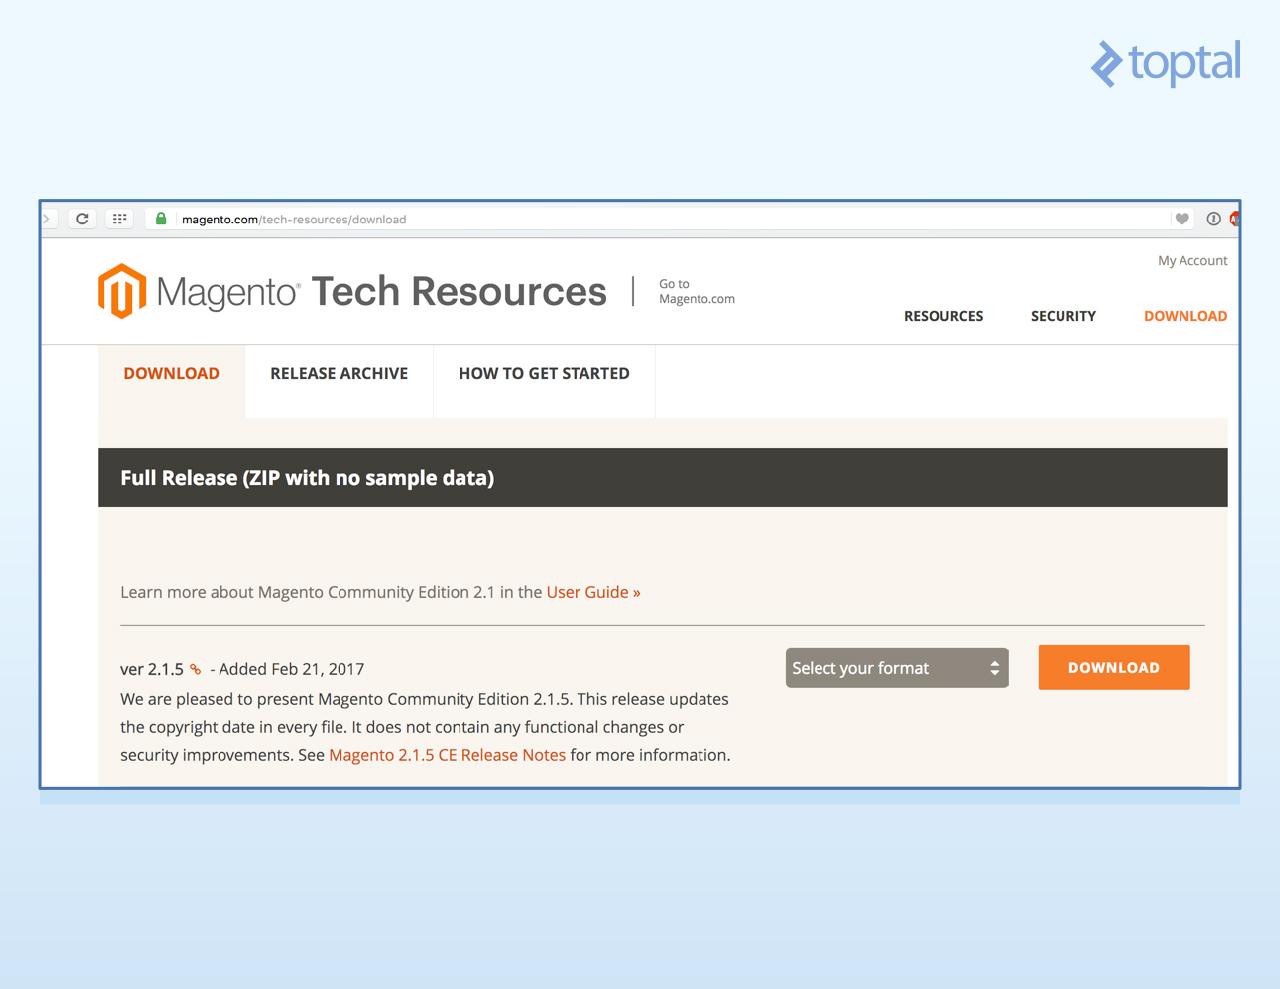
Okay, at this point your machine has what it needs to run Magento 2, missing only the beast itself. Head over to the Magento website and create an account if you still don’t have one. After that, go to the download page and download the latest version (2.1.5, at the time of writing):

Remember to change the database name (user (
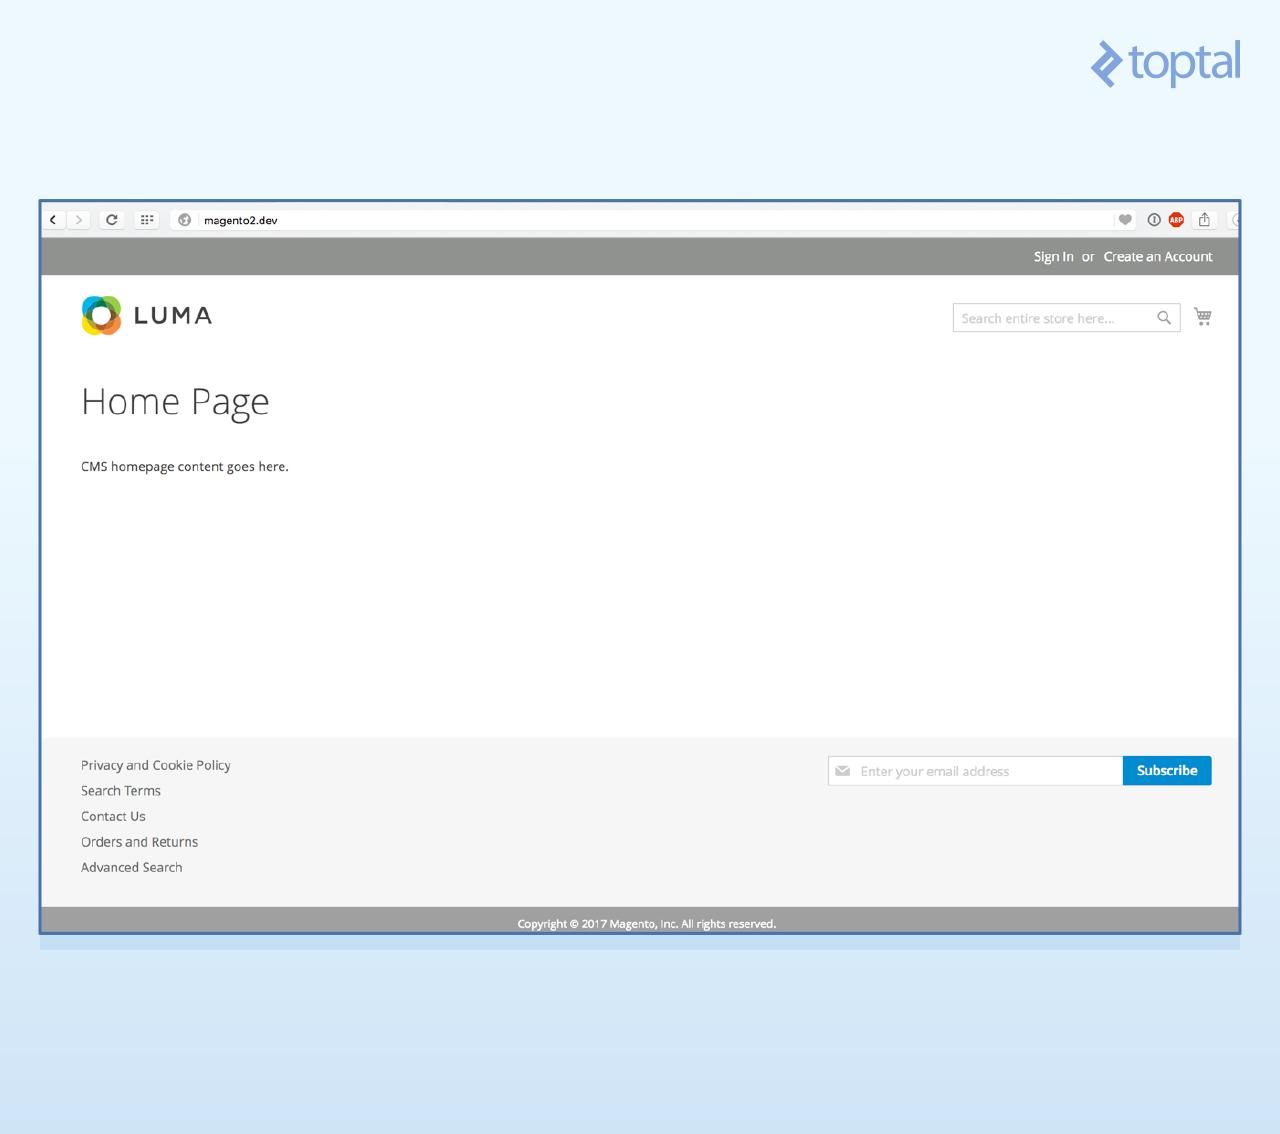
db-name), db-user) and password (db-password) to match the one you used during MySQL’s installation, and that’s it! This command will install all of Magento 2’s modules, creating the required tables and configuration files. After it is finished, open up your browser and head to http://magento2.dev/. You should see a Magento 2 clean install with the default Luma theme: 1

Then use the credentials below to login:
We’re finally ready to start writing our code!User: admin
Password: admin123
Creating Our First Magneto 2 Module
To complete our module, we will have to create the following files, and I will guide you through the whole process. We will need:
- A few boilerplate registration files, to make Magento aware of our Blog module
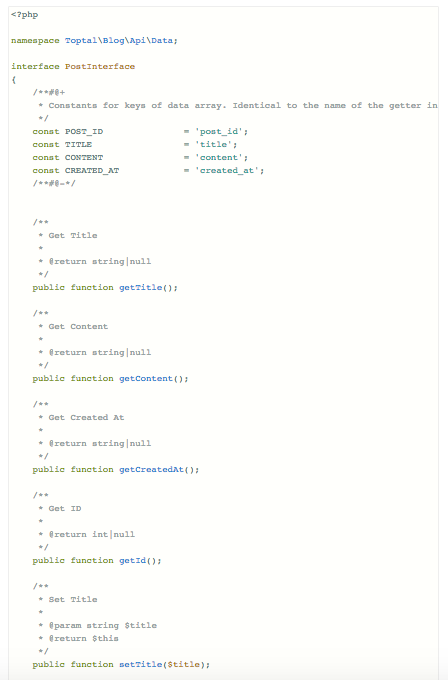
- One interface file, to define our data contract for the Post
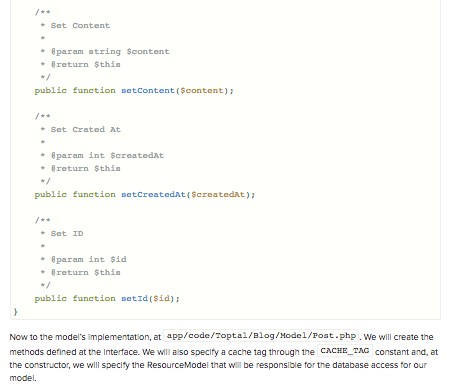
- A Post Model, to represent a Post throughout our code, implementing the Post data interface
- A Post Resource Model, to link the Post Model to the database
- A Post Collection, to retrieve several posts at once from the database with the help of the Resource Model
- Two migration classes, to set up our table schema and content
- Two Actions: one to list all posts and another to show each post individually
- Two each of Blocks, Views, and Layout files: One of each for the list action, and one of each for the view
vendor folder. 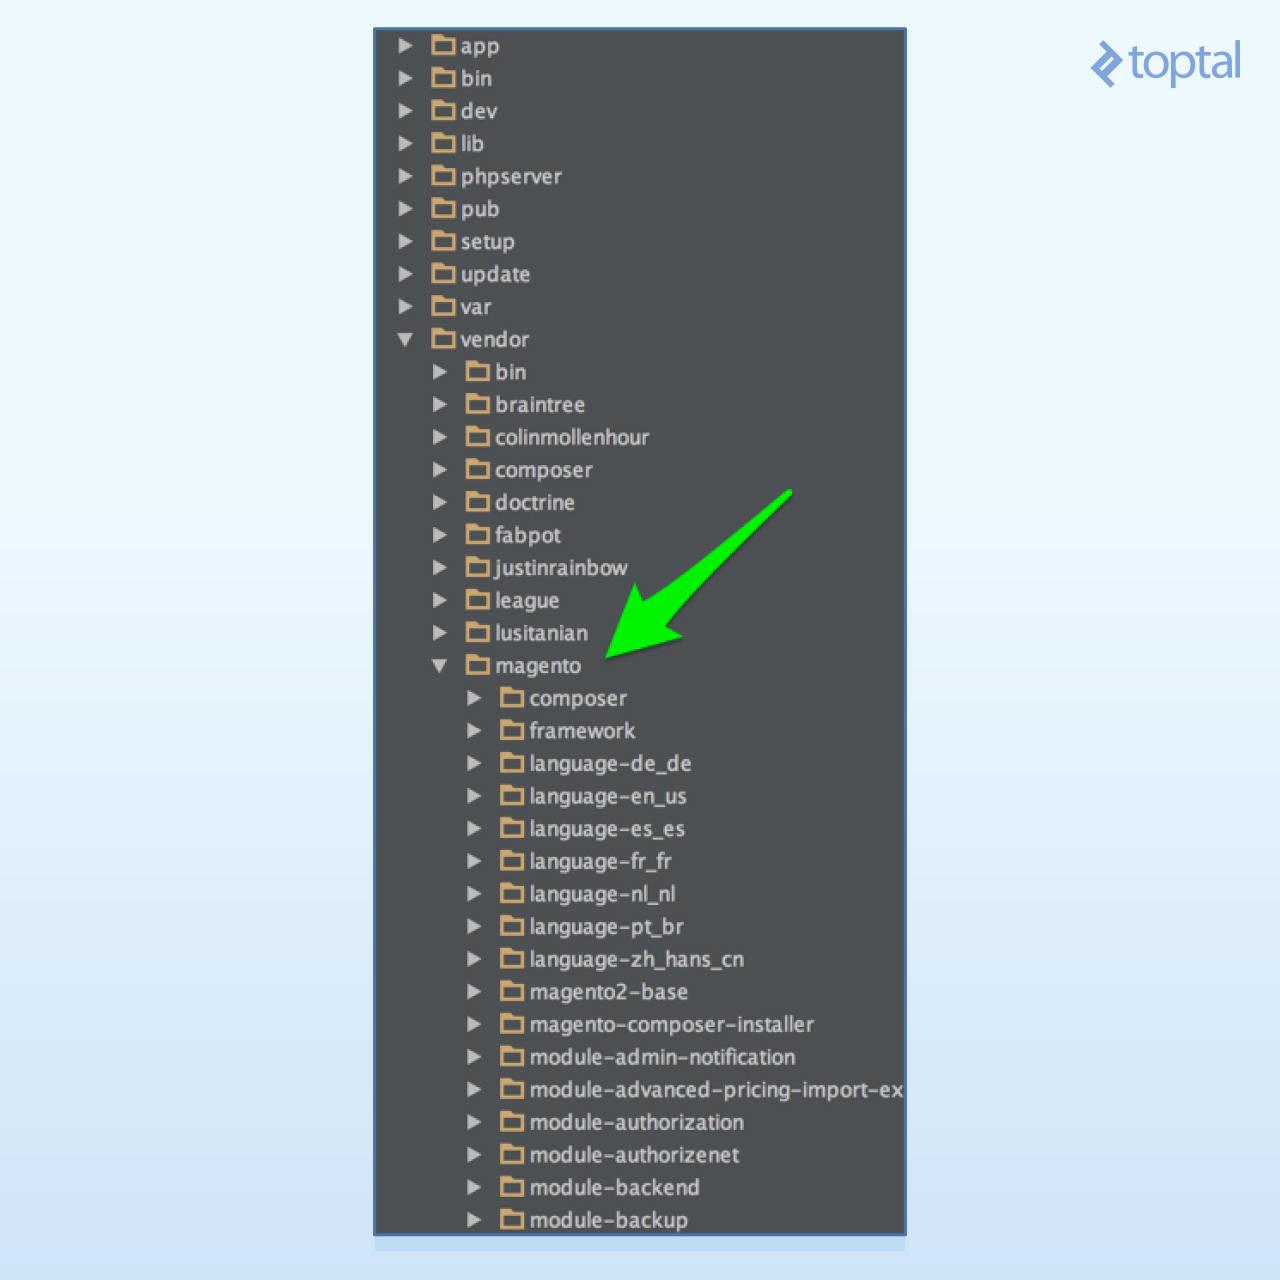
Registering Our Module
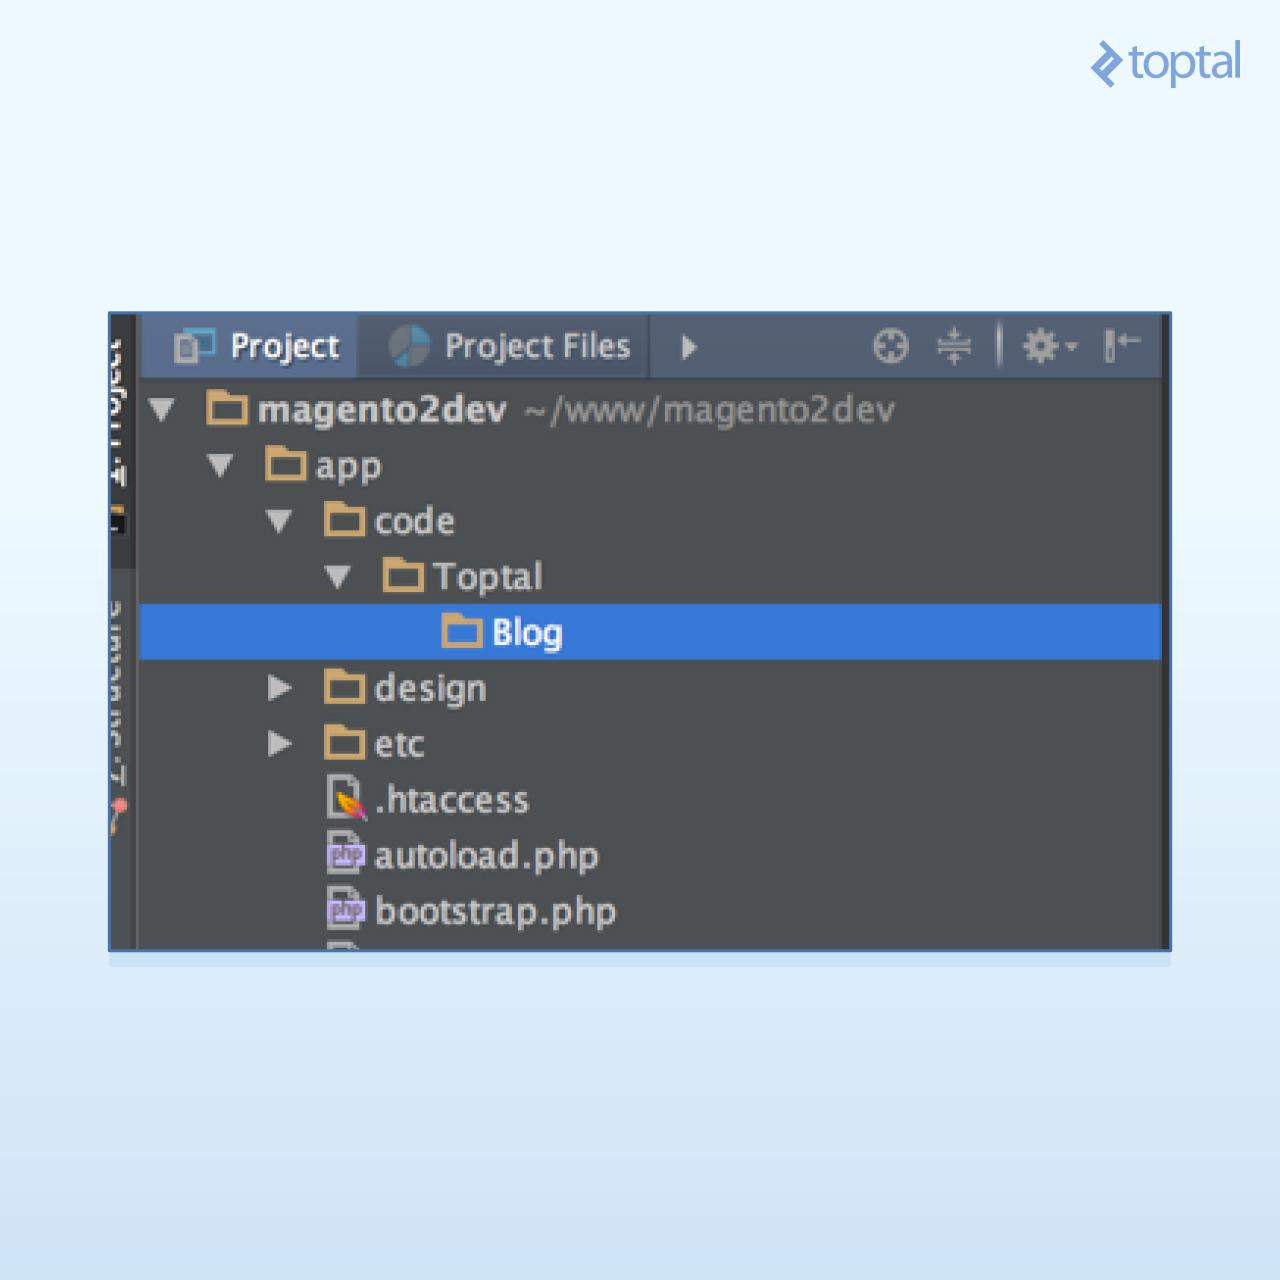
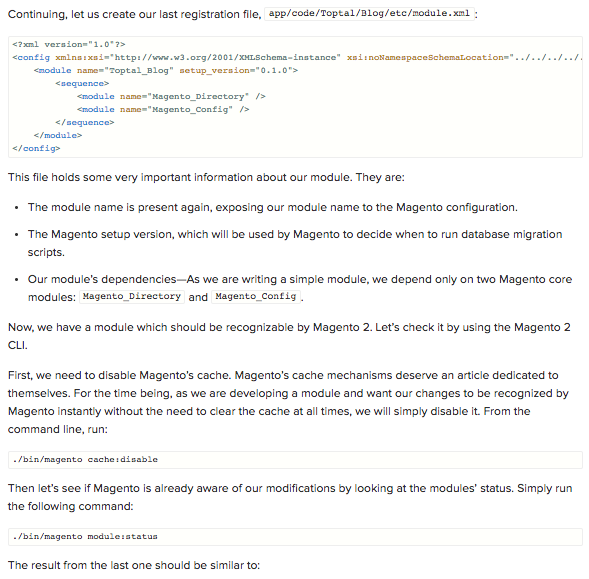
We will keep our code in a separateapp/codeNamespace_ModuleNameapp/code/Namespace/ModuleName for this example. Following that pattern, we will name our Toptal_Blogapp/code/Toptal/Blog4


Handling Data Storage
Now that we’ve enabled our module, we need to create the database table which holds our blog posts. This is the schema for the table we want to create:
| Field | Type | Null | Key | Default |
|---|---|---|---|---|
| post_id | int(10) unsigned | NO | PRI | NULL |
| title | text | NO | NULL | |
| content | text | NO | NULL | |
| created_at | timestamp | NO | CURRENT_TIMESTAMP |
We achieve this by creating
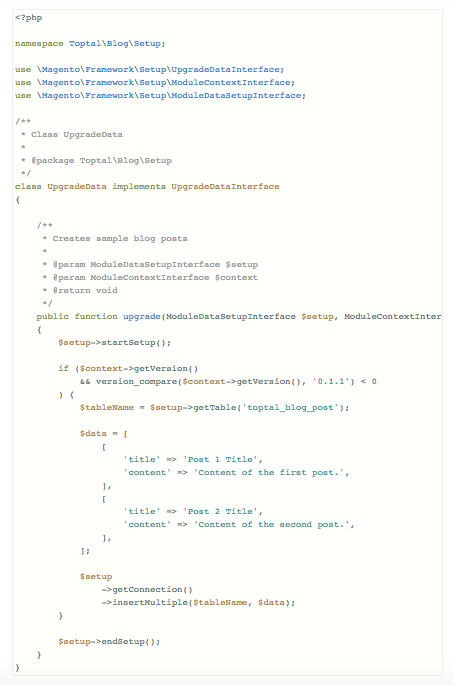
InstallSchemaapp/code/Toptal/Blog/Setup/InstallSchema.php and has the following content: 1


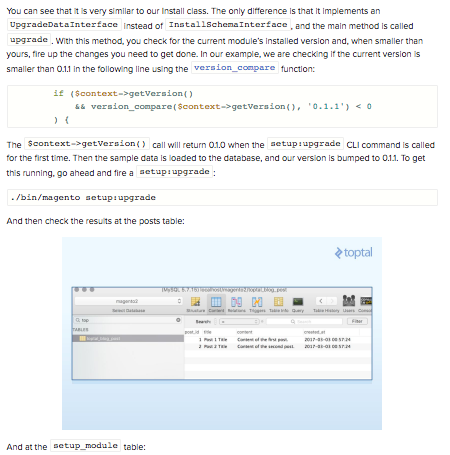
If you analyze install
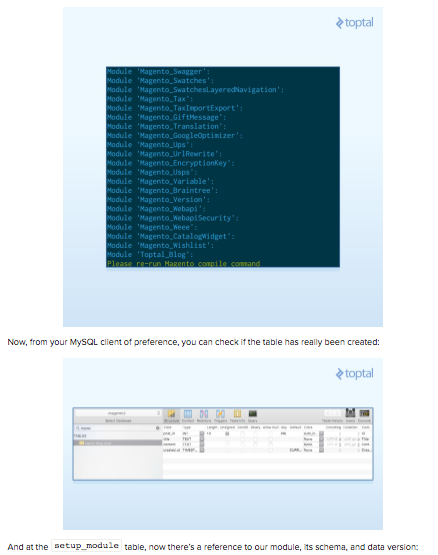
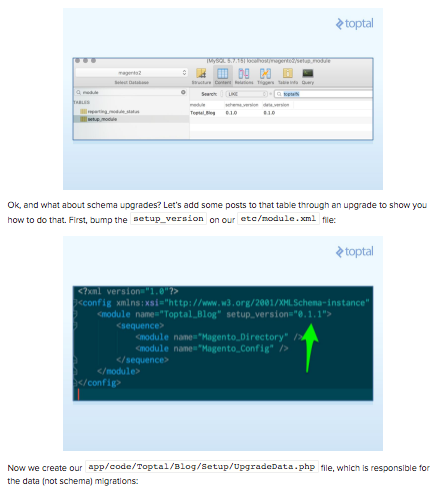
To determine when to run a schema migration, Magento keeps a table with all of the current setup versions for each module, and whenever a module version changes, its migration classes are initialized. This table setup_module
./bin/magento setup:upgrade 2


Our action is defining two methods. Let us take a closer look at them:
The constructor method simply sends
the $contextparameter to its parentmethod, and setsthe $resultPageFactoryparameter to an attribute for later use. At thispoint it is useful to know the Dependency Injection design pattern, as that is what is happening here. In Magento 2’scase we have automatic dependency injection. This means that whenever a class instantiation occurs, Magento will automatically try to instantiate all of the class constructor parameters (dependencies) and inject it for you as constructor parameters. It identifies which classes to instantiate for each parameter by inspecting the type hints, in thiscase Contextand PageFactory. The executemethod is responsible for the action execution itself. In our case, we are simply telling Magento to render its layout by returninga Magento\Framework\View\Result\Pageobject. This will trigger the layout rendering process, which we will create in a bit.
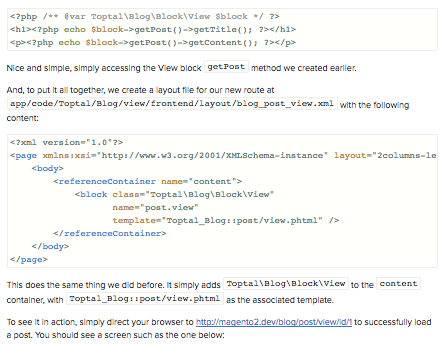
Now you should see a blank page at the
view/frontend/layoutblog/index/indexapp/code/Toptal/Blog/view/frontend/blog_index_index.xml14
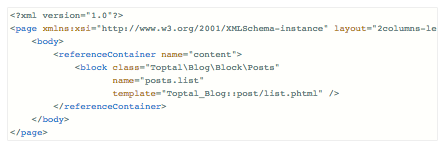
Here, we must define three very important structures in the Magento layout structure: Blocks, Containers, and Templates.
Blocks are the ViewModel part of our MVVM architecture, which was explained in earlier sections. They are the building blocks of our template structure.
Containers contain and output Blocks. They hold blocks together in nice hierarchical
structures, and help in making things make sense when the layout for a page is being processed.Templates are PHMTL (mixed HTML and PHP) files used by a special type of block in Magento. You can make calls to methods of a
$blockvariable from within a template. The variable is always defined in the template context. You will be invoking your Block’s methods by doing so, and thus allowing you to pull information from the ViewModel layer to the actual presentation.
With that extra information at hand, we can analyze the XML layout structure above. This layout structure is basically telling Magento that, when a request is made to blog/index/indexToptal\Blog\Block\PostscontentToptal_blog::post/list.phtml
app/code/Toptal/Blog/Block/Posts.php: 6

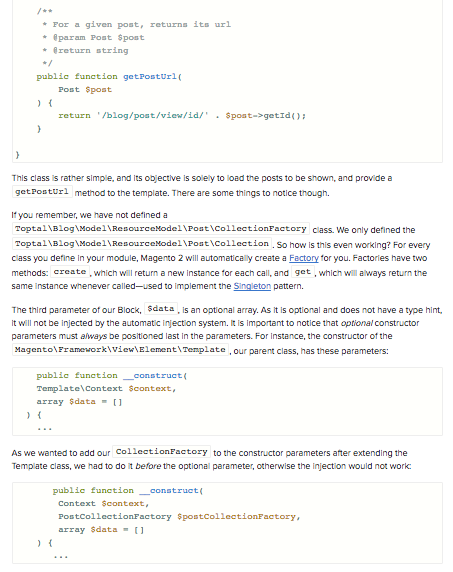
At the getPosts method, which will be accessed later by our template, we simply call the create method from the PostCollectionFactory, which will return us a fresh PostCollection and allow us to fetch our posts from the database and send it to our response.
app/code/Toptal/Blog/view/frontend/templates/post/list.phtml: 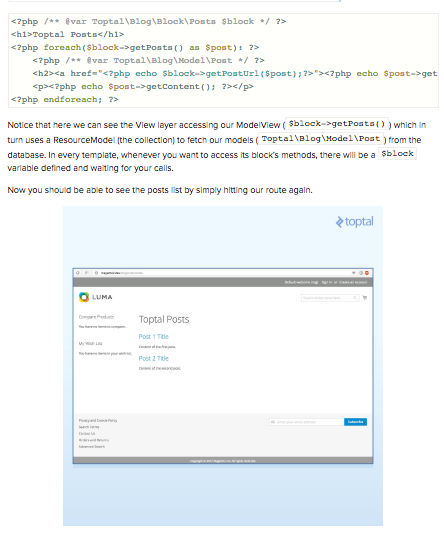
Viewing Individual Posts
Now, if you click on a post title, you will get a 404, so let’s fix that. With all of our structure in place, this becomes quite simple. We will need only to create the following:
- A new action, responsible for handling requests to the
blog/post/viewroute - A Block to render the post
- A
PHTML template, responsible for the view itself - A layout file for the blog/post/view route, putting these last pieces together.
idapp/code/Toptal/Blog/Controller/Post/View.php and these are its contents: 2

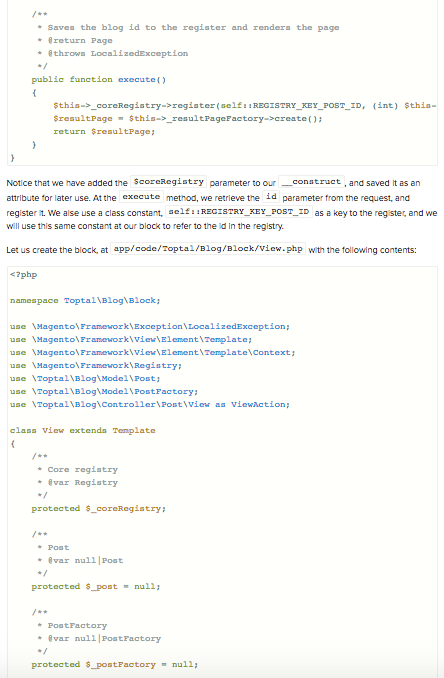

At the view block, we define a protected _getPostIdgetPost
app/code/Toptal/Blog/view/frontend/templates/post/view.phtml with the following contents: 4
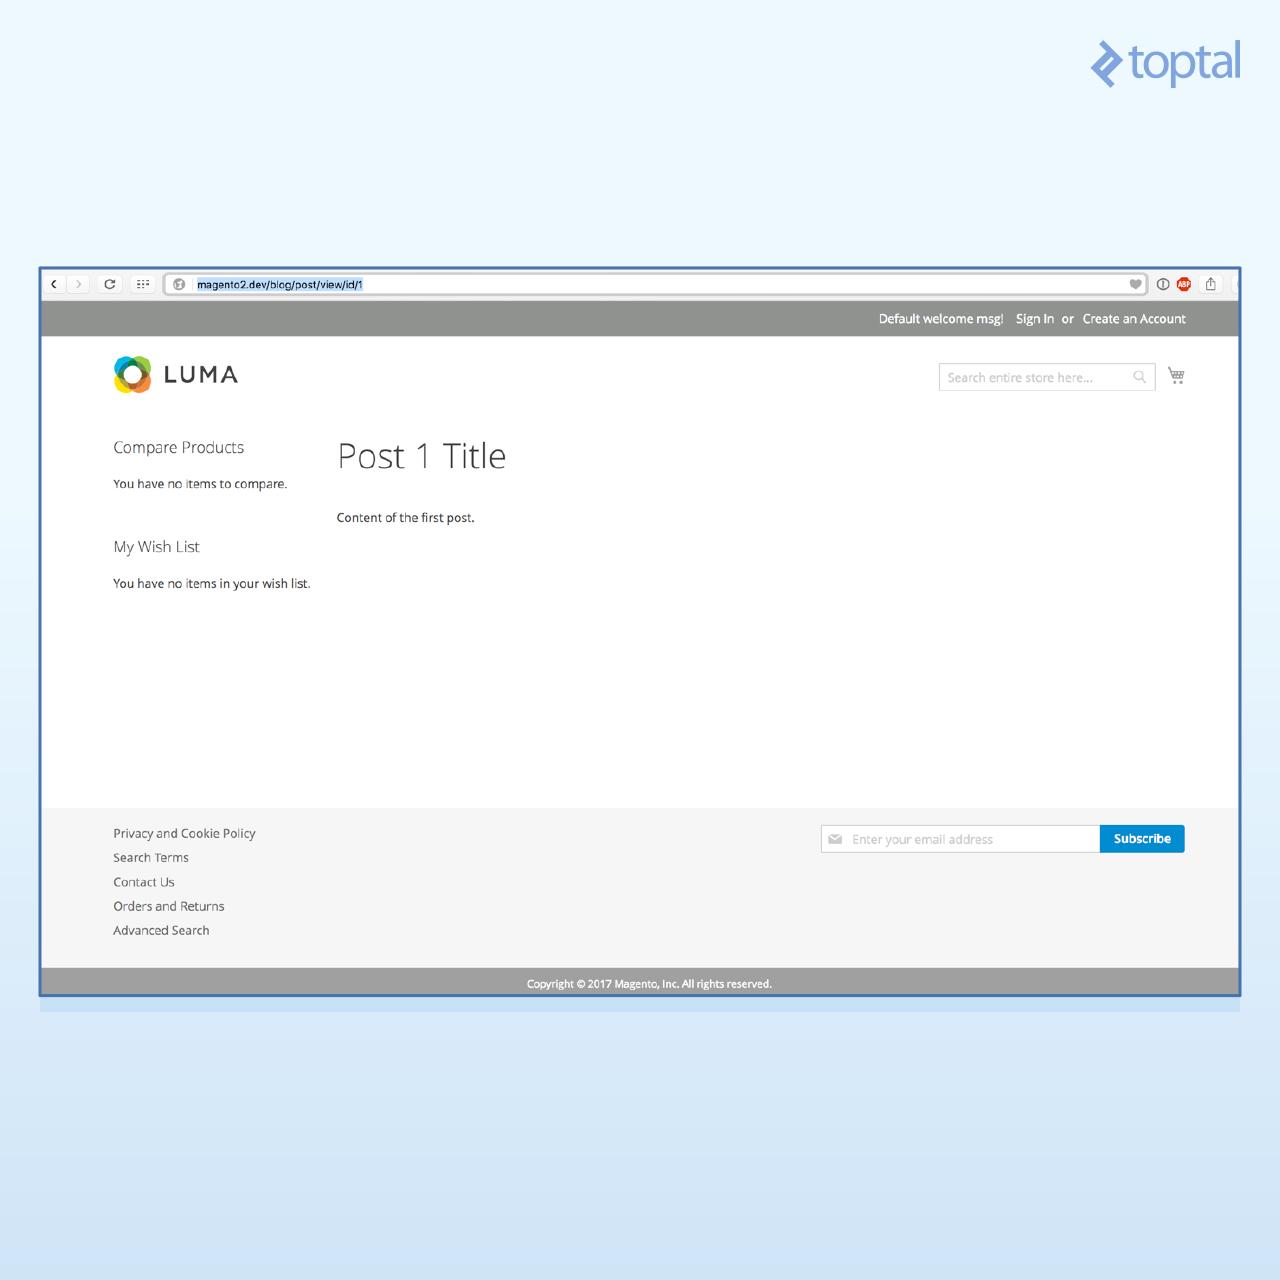
And as you can see, after creating our initial structure, it is really simple to add features to the platform, and most of our initial code is reused in the process.
In case you want to quickly test the module, here is the total result of our work.Where to Go from Here
If you have followed me up until here, congratulations! I am positive you are quite close to becoming a Magento 2 developer. We have developed a pretty advanced module, and even though it is simple in its features, a lot of ground has been covered.
Some things were left out from this article, for the sake of simplicity. To name a few:
- Admin edit forms and grids to manage our blog content
- Blogs categories,
tags and comments - Repositories and a few service contracts we could have established
In any case, here are some useful links where you can deepen your knowledge even more:
- Alan Storm Blog on Magento 2 — Alan Storm has probably the most didactic content when it comes to learning Magento.
- Alan Kent’s Blog
- Magento 2 Dev Docs
2
https://www.toptal.com/magento/magento-2-tutorial-building-a-complete-module
Magento built a reputation as an e-commerce market leader, all thanks to its ease of use and customizability. Getting into the framework was only made easier with the release of Magento 2. In this post, Toptal Software Engineer Gabriel Queiroz Silva gives us a step-by-step tutorial to building your first Magento 2 website.
Related Posts:
Post a Comment
You may also be interested in
Share your perspective

Share your achievement or new finding or bring a new tech idea to life. Your IT community is waiting!


