Building Cross-platform Apps with Xamarin: Perspective of an Android Developer
Published on 01 May 17
 Michelle
0
1
Writing code once and using it on multiple platforms has been a dream of many software developers. Although this has been possible for some time now, it always came at the cost of maintainability, ease of testing, or even worse, poor user experience.
Developing mobile applications using the native SDK is probably the starting point for all developers who have their roots in the realm of desktop application development. Programming languages would become a barrier for some: If someone
I was always skeptical of cross-platform application development. JavaScript-based frameworks like Sencha, Cordova, Titanium, etc. never prove to be a wise choice when performance is important. Lack of APIs and quirky user experience were a given with these frameworks.
But then, I came across Xamarin.1

In this article, you will learn how you can use Xamarin to share code across multiple platforms without compromising any of the other aspects of mobile application development. The article will focus on Android and iOS in particular, but you can use a similar approach add support for any other platform that Xamarin supports.
What is Xamarin
Xamarin is a development platform that allows you to write cross-platform—yet native—applications for iOS, Android, and Windows Phone in C# and .NET.
Xamarin provides C# bindings to native Android and iOS APIs. This gives you the power to use all of Android and iOS’ native user interface, notifications, graphics, animation, and other phone features—all using C#.
Each new release of Android and iOS is matched by Xamarin, with a new release that includes bindings for their new APIs.
Xamarin’s port of .NET includes features such as data types, generics, garbage collection, language-integrated query (LINQ), asynchronous programming patterns, delegates, and a subset of Windows Communication Foundation (WCF). Libraries are managed with a linger to include only the referenced components.
Xamarin.Forms is a layer on top of the other UI bindings and the Windows Phone API, which provides a completely cross-platform user interface library.
Writing Cross-platform Applications
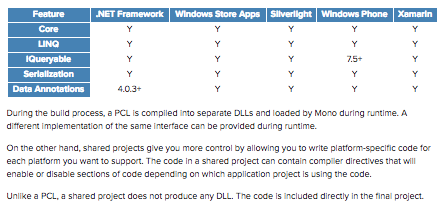
In order to write cross-platform applications with Xamarin, developers need to choose one of the two available types of projects:
- Portable Class Library (PCL)
- Shared Project
1
The table below shows which APIs are available on which platforms:
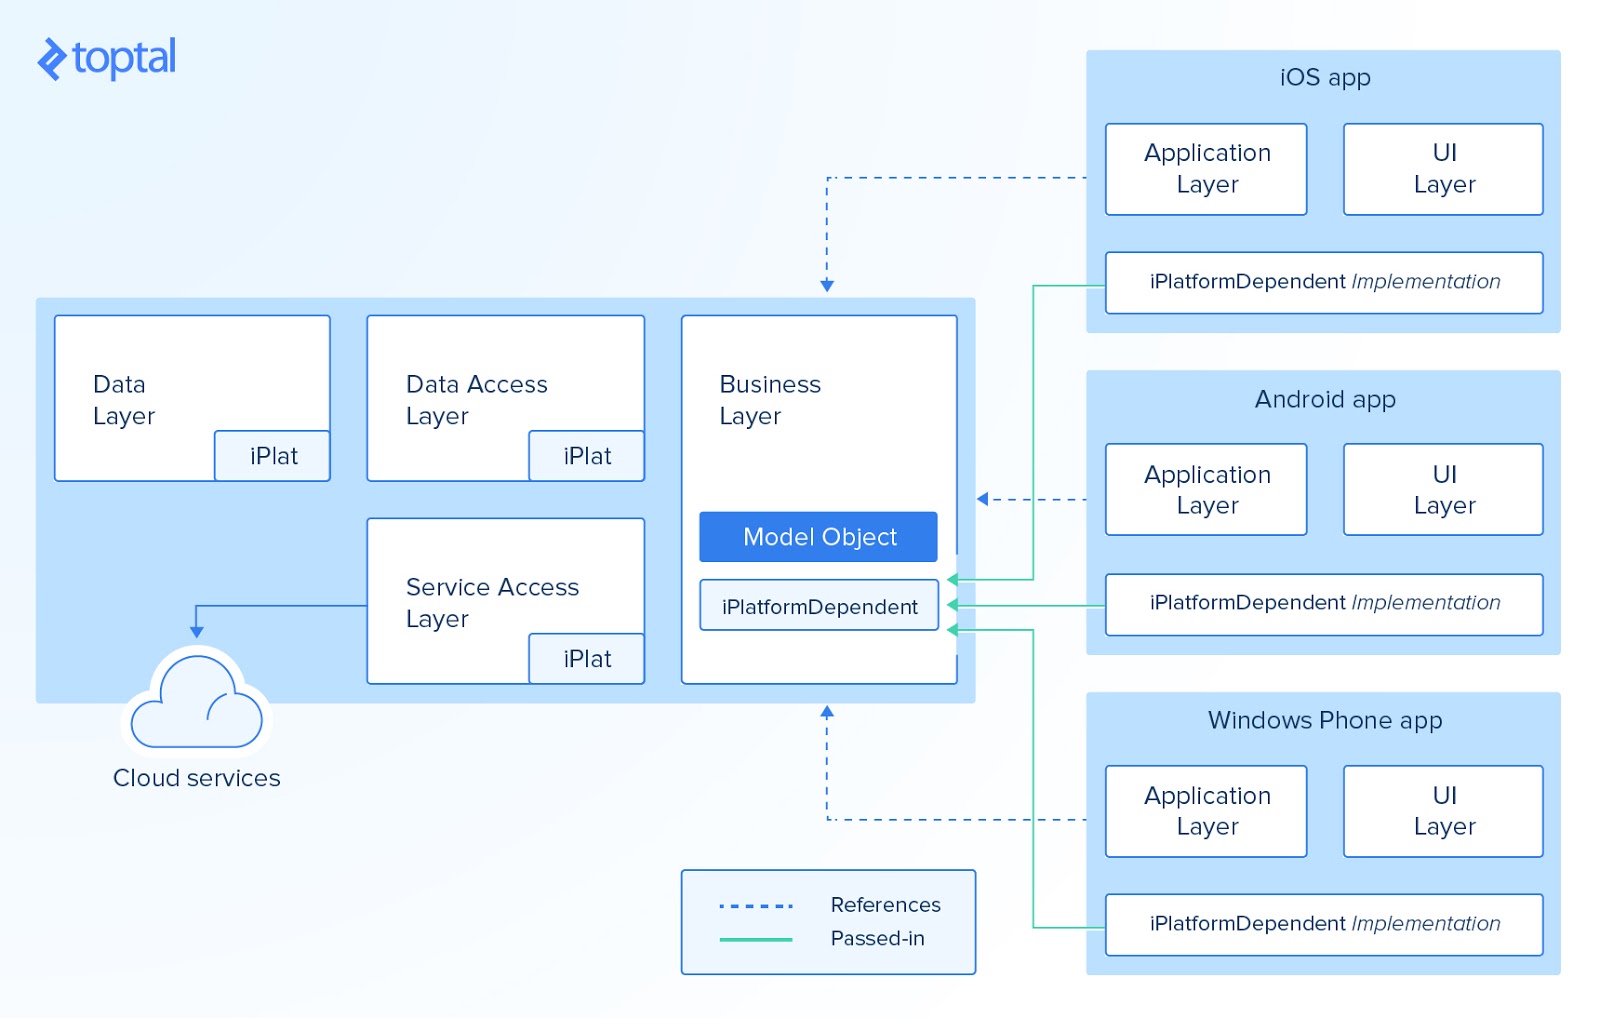
Giving Structure to your Cross-platform Code with MvvmCross
Xamarin by itself provides a mechanism which makes writing reusable cross-platform code much easier.
Mobile developers are familiar with scenarios where they have to write the same logic twice or more in order to support iOS, Android, and other platforms. But with Xamarin, as explained in the previous chapter, it is easy to reuse code which is written for one platform for some other platforms too.
Where does MvvmCross come into place, then?
MvvmCross, as the name may have hinted, makes it possible to use the MVVM pattern in Xamarin applications. It comes with a bunch of libraries, APIs, and utilities which are really handy in cross-platform application development.
MvvmCross can significantly reduce the amount of boilerplate code that you would have written (sometimes multiple times in different languages) in any other approach to application development.
Structure of an MvvmCross Solution
The MvvmCross community recommends a pretty simple and efficient way of structuring 4
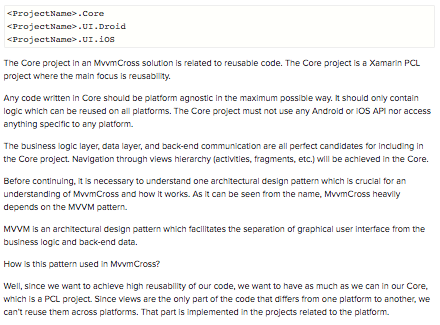
MvvmCross gives us the ability to orchestrate application navigation from the Core using ViewModels.
With the basics and technical details out of the way, let’s get started with Xamarin by creating our very own MvvmCross Core project:
Creating an MvvmCross Core Project
Open Xamarin Studio and create a solution ToptalExampleSolution2
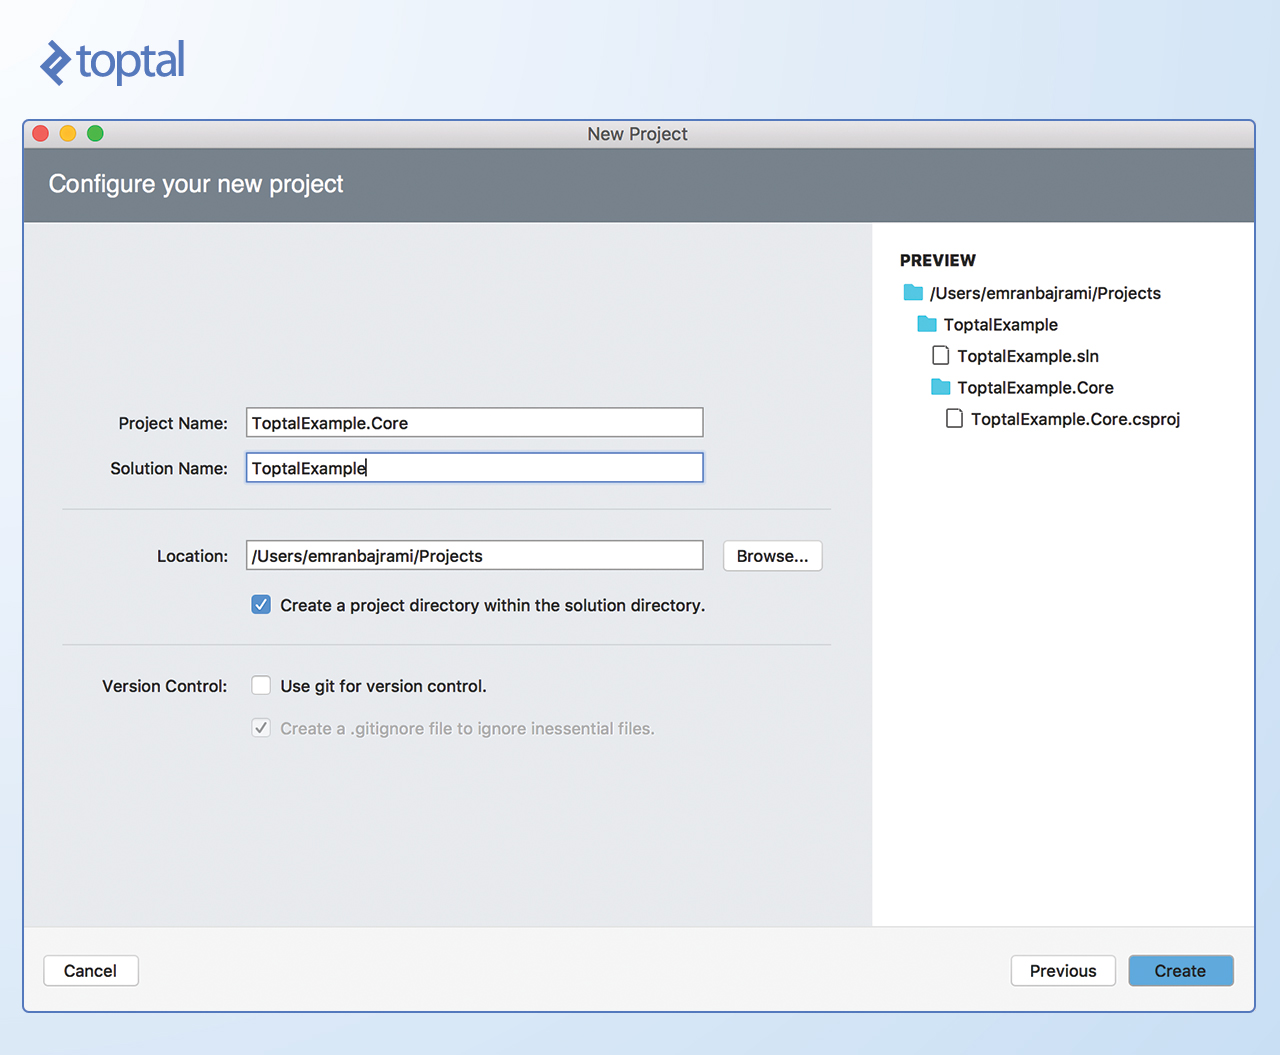
Since we are creating a Core project, it is a good idea to stick with the naming convention. Make sure Core
In order to get MvvmCross support, it is required to add MvvmCross libraries to our project. To add that we can use built-in support for NuGet in Xamarin Studio.
To add a library right click on the Packages folder and select the Add Packages… option.
In the search field, we can search for MvvmCross, which is going to filter out results related to MvvmCross as shown below:1
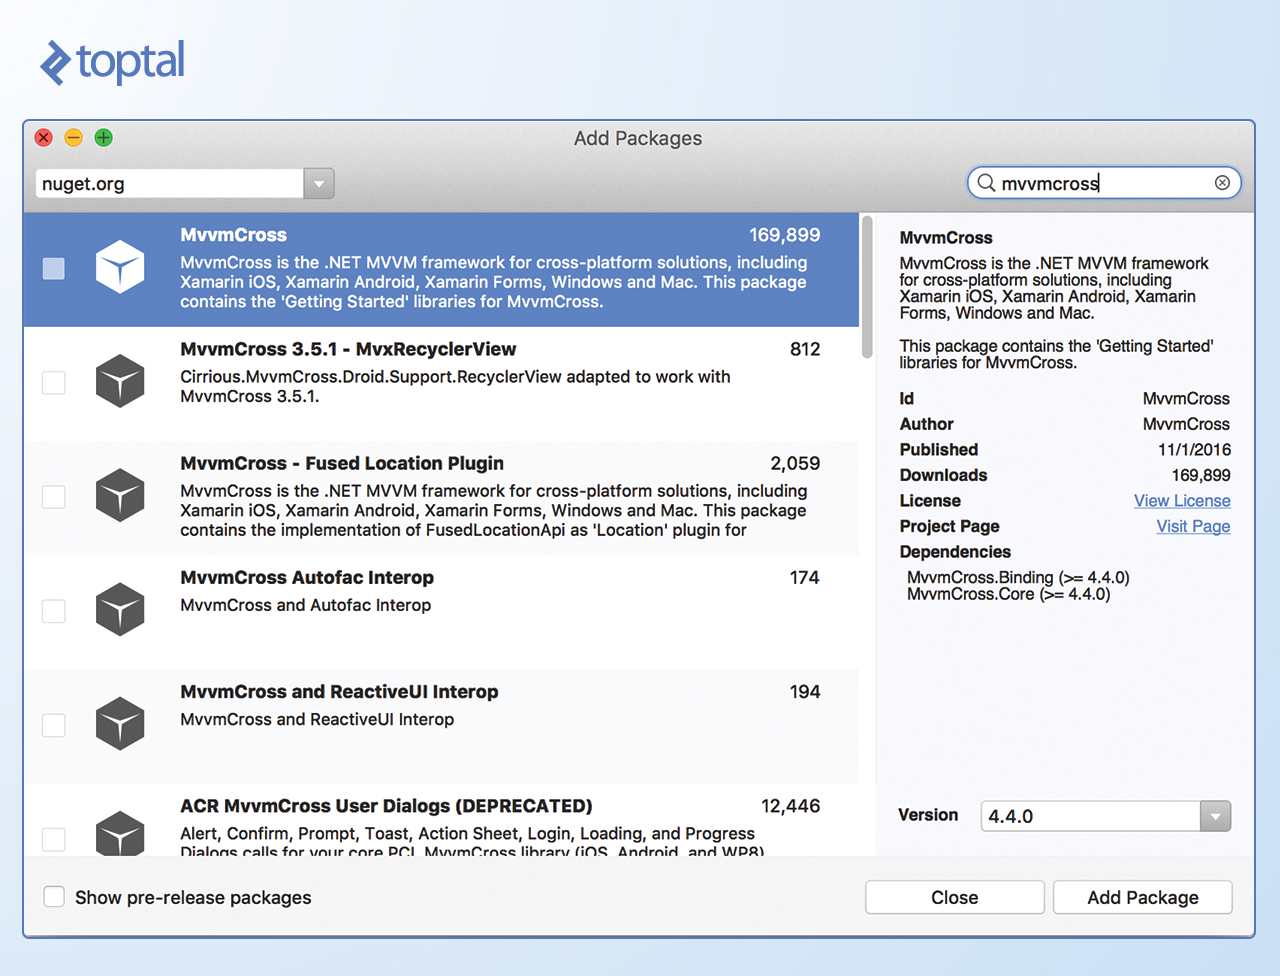
Clicking on the Add Package button will add it to the project.
With MvvmCross added to our project, we are ready to write our Core code.
Let’s define our first ViewModel. In order to create one, create a hierarchy of folders as follows: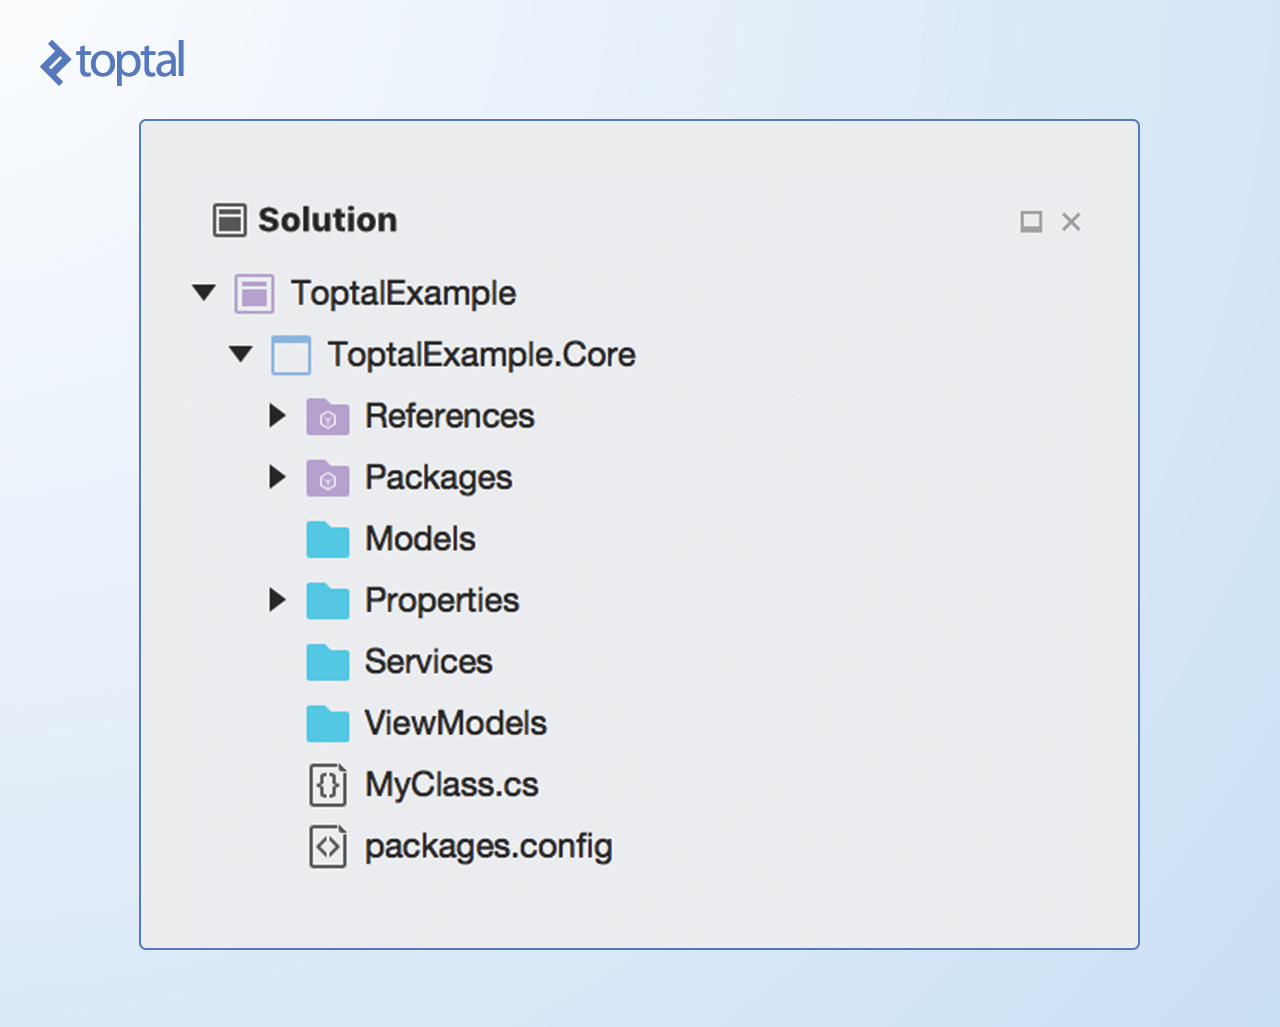
Here is what each of the folders is about:
- Models: Domain models which represent real state content
- Services: A folder which holds our service (business logic, database, etc.)
- ViewModel: The way we communicate with our models
FirstViewModel.cs 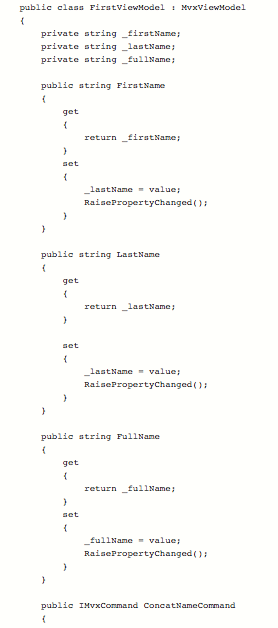
Now that we have our first ViewModel, we can create our first view and bind things together.
Android UI
To show content of the ViewModel, we need to create a UI.
The first step to creating an Android UI is to create an Android project in the current solution. To do that, right-click on the solution name and select Add -> Add New Project…. In the wizard, select Android app and make sure that you name your project ToptalExample.UI.Droid.
As described earlier, we now need to add MvvmCross dependencies for Android. To do that, follow the same steps as for Core project for adding NuGet dependencies.
After adding MvvmCross dependencies, it is required to add a reference to our Core project so we can use our code written there. To add a reference to the PCL project, right-click on the References folder and select Edit References… option. On the Projects tab, select the previously created Core project and click OK.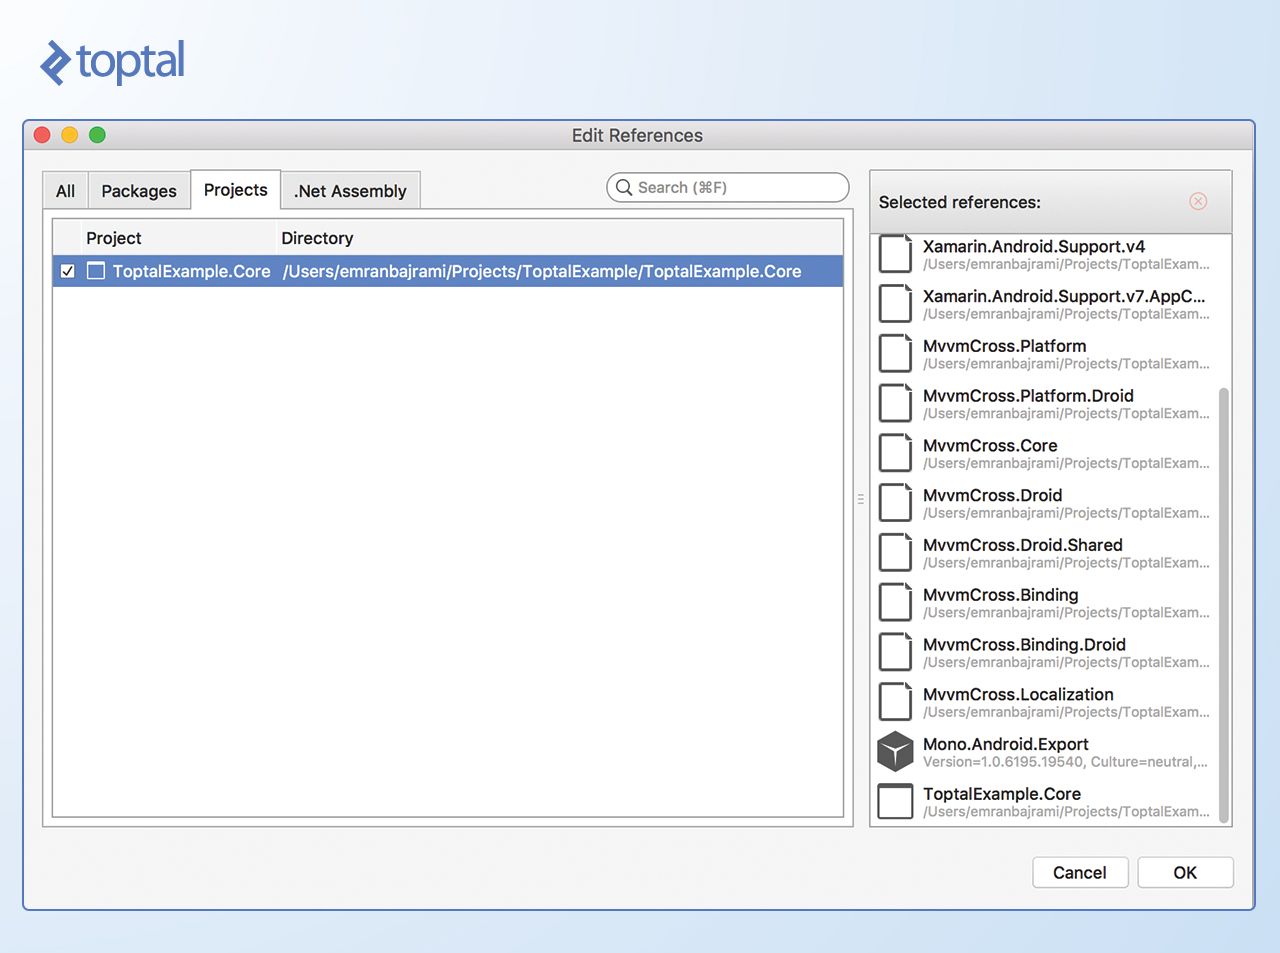
iOS UI
Creating an iOS project is not really different from creating an Android project. You need to follow similar steps for adding a new project, only this time, instead of Android, just create an iOS project. Just make sure that you keep the naming convention consistent.
After adding the iOS project, you need to add dependencies for MvvmCross iOS. Steps are absolutely the same as for Core and Android (right click on References in your iOS project and click Add References…).
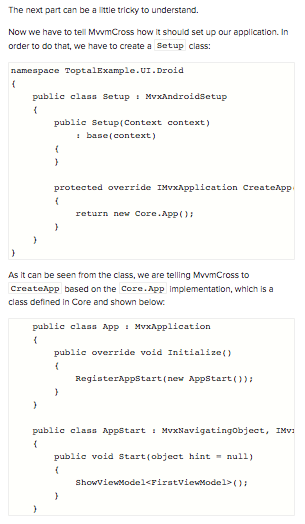
Now, as we did for Android, it is required to create aSetup class, which is going to tell MvvmCross how to set up our application. 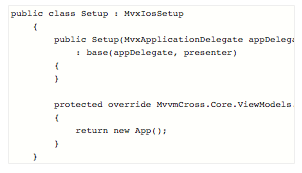
Note that Setup
One addition here is that we have to change AppDelegate
AppDelegate on iOS is responsible for launching the user interface, so we have to tell how the views are going to be presented on iOS. You can learn more about presenters here. 2
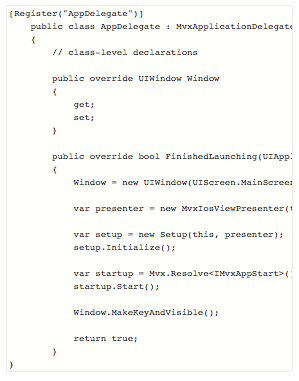
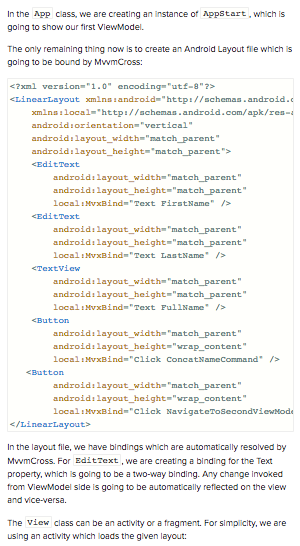
In order to present our
Xamarin creates three files in which we are going to define what our bindings are going to be. Unlike Android, for iOS, we have to define our bindings in a different way, through code (although we can do that on Android too and, for some cases, it is required to do so).
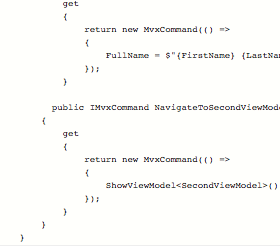
When it is required to navigate between views, it is done via the ViewModel. In the NavigateToSecondViewModelCommandShowViewModel<SecondViewModel>()
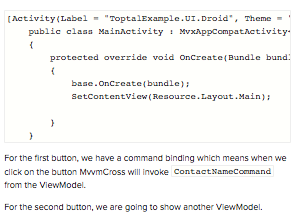
But, how does MVVMCross know which view to load?
There isn’t any magic in that. When we create a view for Android (Activity or Fragment) we are extending one of the base classes with type parameters (MvxAppCompatActivity<VM>). When we ShowViewMolel<VM>View which ActivityFragmentVM
Inversion of Control
Since Xamarin is merely providing C# wrappers around native APIs, it isn’t providing any form of dependency injection (DI) or inversion of control (IoC) mechanism.
Without runtime injection of dependencies or compile time injection, it is not easy to create loosely coupled, reusable, testable, and easily maintainable components. The idea of IoC and DI has been known for a really long time; details about IoC can be found in many articles online. You can learn more about these patterns from Martin Fowler’s introductory article.
IoC has been available since early versions of MvvmCrosses, and it allows injection of dependencies at runtime when the application starts and whenever they are required.
In order to get loosely coupled components, we should never require concrete implementations of classes. Requiring concrete implementations limits the ability to change the behavior of the implementations during runtime (you cannot replace it with another implementation). It makes it difficult to test these components.
For that reason, we are going to declare an interface for which we are going to have one concrete implementation.7
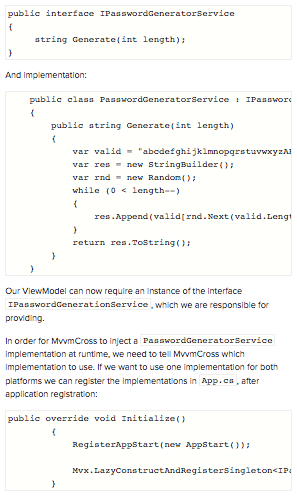
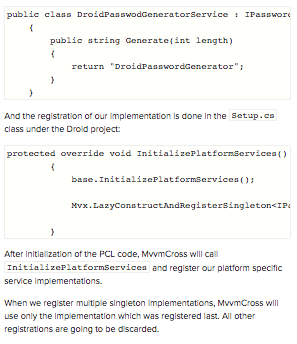
The above call to static LazyConstructAndRegisterSingleton<TInterface, TType>
The object is created only when it is required and only once since it is registered as a singleton.
If we want to create a singleton object right away, it can be achieved by Mvx.RegisterSingleton<TInterface>()
There are cases where we don’t want to have only singletons in our application. Our object may not be thread-safe or there may be some other reason why we want to always have a new instance. If that’s the case, MvvmCross provides Mvx.RegisterType<TInterface,TType>()
4
Build Cross-platform Apps with Xamarin
In this article, you have seen how Xamarin allows you to share code across different platforms and still keep the native feel and performance of the applications.
MvvmCross gives another layer of abstraction further enhancing the experience of building cross-platform applications with Xamarin. The MVVM pattern provides a way to create navigation and user interaction flows that are common for all platforms, making the amount of platform-specific code you need to write limited to views alone.
I hope this article has given you a reason to take a peek into Xamarin and motivated you to build your next cross-platform application with it.
https://www.toptal.com/xamarin/cross-platform-apps-with-xamarin
Discover the realm of Xamarin from the perspective of an Android developer, and learn how to build cross-platform mobile apps without compromising quality.
This blog is listed under
Development & Implementations
Community
Related Posts:
Post a Comment
You may also be interested in
Share your perspective

Share your achievement or new finding or bring a new tech idea to life. Your IT community is waiting!