The Salesforce Release Train: A Practical Approach to Release Management
Published on 26 September 17
 Michelle
0
1
Release management, as the name suggests, is the process of managing, planning, scheduling and controlling a software build through different stages and environments; including testing and deploying software releases (Humble & Farley, 2011).
It is a pretty big topic in itself and can only be perfected over time by trying different iterations with the development teams and matching business needs or feature releases. We will try to cover the industry practices of metadata management, CI building, and sandbox management for managing an organization’s release train.
But what is a release train?
A release train is an incremental and predictable feature delivery technique. It requires the developer to set up a formal process to take any changes made in the development environment and deploy them to production.
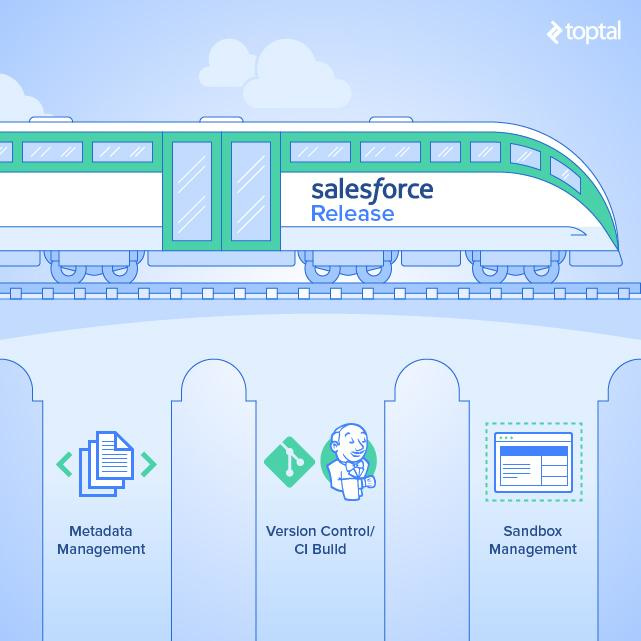
A release train can broadly be divided into three segments:
- Metadata management
- Continuous integration build
- Sandbox management
Metadata Management
Metadata is data that provides information about other data. Salesforce provides a rich and powerful metadata model via its Metadata API. Your application metadata describes and encompasses a set of methods that provide programmatic access to the source code and configuration of your organization.
The Metadata API is the best way to manage the customizations in Salesforce. It createreadupdatedelete
Each tool has its own advantages, and there are several things to consider when picking one:
Table 1: Tool Comparison for Metadata Migration
| Change Sets | Force.com IDE | Ant Migration Tool |
|---|---|---|
| Change Sets are the way to deploy components via the standard Salesforce UI. | Force.com IDE (Eclipse) is primarily intended for Apex | Ant Migration is a powerful command line tool, dedicated for migrating changes/metadata between environments. |
| Usually used for a small number of component migration. | Developers usually use the IDE for migrating changes to the testing or staging environment. | Ant Migration is used for Large payload migration and needs advanced knowledge of the Salesforce Metadata API. |
| It can be used to deploy to any | Automatic deployments can be scheduled very easily. | |
| Intended for use by administrators. | Geared towards salesforce developers, since developing the code is its primary use. | Geared towards DevOps engineers. |
| Adding dependencies is very easy and | Adding dependencies is somewhat easy, as it provides a point and | Deployment usually fails due to missing dependencies. |
| Doesn’t allow destructive changes. | Does allow destructive | Allows destructive |
The Metadata API is great at serving its purpose when developing and migrating changes on the Force.com platform. But there is a slight catch - not all of the Salesforce metadata is supported by the Metadata API. The official documentation provides a list of unsupported components.
If your organization is making changes that are not supported by the Metadata API, you have to make sure to replicate those changes manually in the destination org. The best way track these changes is a spreadsheet. If you have to resort to this approach, it’s always advisable for a single person to make these changes and track them.
This would be a good general list of columns that one could use for tracking these changes in a spreadsheet:
- Name of component
- Type of component
- Change owner
- Description of functionality
- Capability mapping
- Dependency with other components
- Reviewed/reviewer name
- URL
- Org name/ID
- Other comments
Version Control and Continuous Integration
Migrating changes to production should be a smooth
Version control is an absolute must for any organization. It allows developers to work in a collaborative, efficient, and safe way. Managing multi-developer, multi-sandbox code development and migration is a challenge in Salesforce. Salesforce also has its own schedule for releases and maintenance. These updates deliver new features, but they could introduce a change in the Metadata API which may break your CI build. So, apart from situations where developers are overwriting each other’s changes, version control helps you in building a rollback strategy. Having a rollback strategy is a must when your application runs on Force.com.
The following flow diagram depicts a practical structure for Version Control and CI. We’ll try to give you a quick description
- A developer would check in their change in the version control system.
- The CI Server/Jenkins would deploy the latest build to the CI sandbox and run test classes.
- If the deployment in step 2 is successful, then changes are merged into the QA branch.
CI would then deploy the latest commit from the QA branch to the QA sandbox.- If QA rejects the changes due to test failures, steps 1 through 3 should be performed again until QA clears the changes.
- After the changes pass testing in QA, the changes are merged into the Master branch.
- Latest changes from the Master branch are deployed to the Master sandbox.
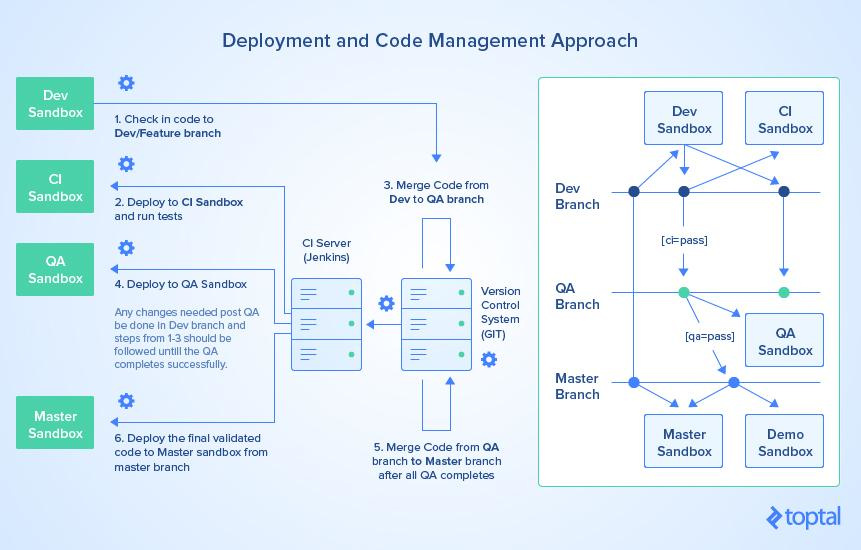
One can choose to add more branches depending on the organization’s needs. But the above structure just works fine for the medium to enterprise level development structures.
Sandbox Management
To get most out of the DevOps process of your organization, it’s very important to set up the sandbox structure. Before we dive much deeper into it, let’s discuss the different types of sandboxes Salesforce offers us.
A sandbox is an almost exact copy of one’s production metadata. Sandboxes are typically used for development, testing, staging, and training purposes. There are four types of sandboxes, and one should give a due consideration while choosing a sandbox. Full Copy sandboxes could cost a lot of money!
Below is the table for the limits enforced by Salesforce for different sandboxes.Table 2: Limit Comparison
| Partial Copy | Full Copy | |||
|---|---|---|---|---|
| Production Data | No | No | Yes | Yes |
| Data Storage | 200 MB | 1 GB | 5GB (10K records per object) | Complete Data |
| Refresh Period | 1 Day | 1 Day | 5 Day | 29 Day |
We can see that price isn’t the only difference between sandboxes.
The developer sandbox has a one-day refresh period, which makes it suitable for development, but can only accommodate 200 MB of data, and no production data. As a polar opposite, full copy sandboxes have an exact copy of the production data; even the record IDs are the same. That could make it great for testing and staging, but the refresh period of 29 days makes it difficult to get the latest production metadata and data in the full copy sandbox.
The table below acts as a rule of thumb for selecting sandboxes:
Table 3: Use Cases for Sandbox Selection
| Partial Copy | Full Copy | |||
|---|---|---|---|---|
| Development | Yes | Yes | No | No |
| QA | Yes | Yes | Yes | No |
| Integration Test | No | No | Yes | Yes |
| Batch Data Test | No | No | Yes | Yes |
| Training | No | No | Yes | Yes |
| UAT | No | No | Yes | Yes |
| Load Test | No | No | No | Yes |
| Staging | No | No | No | Yes |
| User Training | No | No | No | Yes |
Below is the typical
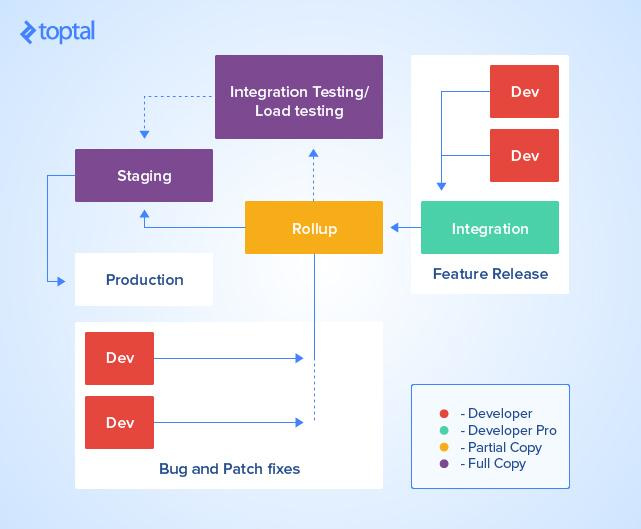
Development work is usually done in the developer sandbox (red) and the changes are moved to the integration sandbox (green) which is usually a developer pro or a partial copy sandbox. Then the changes from multiple integration sandboxes are moved up to the
If your organization has any
These changes are then moved to the integration testing sandbox, where tests are performed. Then the changes are moved to the staging sandbox, which should be a full copy sandbox. All the test classes are run before deployment. A deployment validation should be performed to make sure that deployment happens without any issues.
This process helps us make sure that the changes go through multiple rounds of testing and pairs of eyes. It comes with a heavy downside of requiring a lot of time to develop, test, and deploy changes.
Very often, there is an urgent need to perform bug fixes or patches. To handle these quickly, one should keep a developer sandbox, which would push small patches directly to the
As mentioned previously, a sandbox is an almost exact replica of production metadata, but not completely. There is an official list of components/features which are disabled in a sandbox.
Another thing to consider while refreshing a sandbox is that it only copies the production metadata and data. There is no way to copy the metadata from one sandbox to
Additionally, if you have some sensitive data in production, which you feel that your development or testing team should not have access to, you can create sandbox templates for fully and partially copied sandboxes.
What to Consider When You Deploy
We have covered the industry practices of application lifecycle management in the Salesforce ecosystem. Metadata and sandbox management play a very important role in creating the deployment packages and payloads. For large and complex Salesforce applications, version control helps in making sure that the metadata changes are tracked while also helping in the creation of a rollback strategy.
Sandbox management is critical for large or complex projects. But the Sandboxes are costly in the Salesforce ecosystem, both in terms of financial resources and time. Formulating a strategy for sandbox management is always critical for the release management process.
We’ll leave you with some extra points that would be good to keep in mind during your next deployment:
- Only 10,000 files, or a 39 MB ZIP file, can be deployed in one go. Naturally, if the payload is too big, you have to divide the
package in multiple parts and then do the deployment. - If the deployment is failing due to
a request timeouterror , try removing objects, custom fields, and profiles from the package. These components take longer to deploy. - If a field type is changed, or there have been changes in the role hierarchy, then there could be long delays due to data recalculation, requiring some time to complete.
- Salesforce locks any component that is being currently used by a user in the system. If we try to deploy while that is the case, deployment will fail.
29
This blog is listed under
Development & Implementations
Community
Related Posts:
Post a Comment
You may also be interested in
Share your perspective

Share your achievement or new finding or bring a new tech idea to life. Your IT community is waiting!


