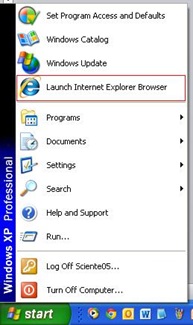
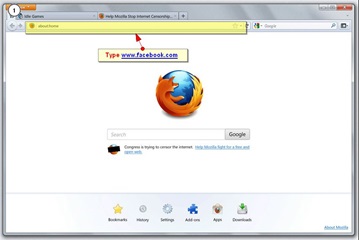
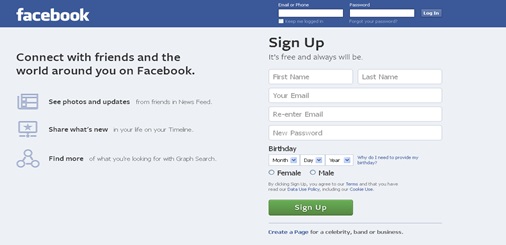
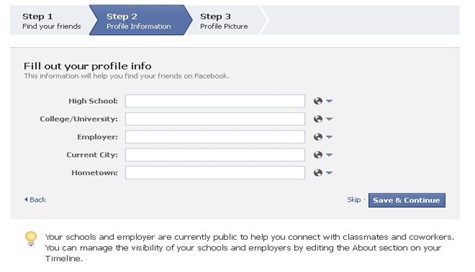
A Beginner's Guide to Facebook
Published on 26 March 14
0
1
#1 Introduction:
Facebook is the world's most popular social networking website. It makes it easy for you to connect and share with your family and friends by posting status updates and sharing photos, videos and links.
There are currently over 900 million people joined with Facebook. Over one billion people like and comment an average of 3.2 billion times every day.
Let’s get started to join the Facebook community!!
#2 How to reach Facebook :
- First you should open any one web browser ( Internet explorer , Google Chrome , Mozila Firefox etc )
- Click window start button
- Choose Internet explorer
- Using your browser, navigate to www.facebook.com.
- The Facebook home page looks like this:
#3 Creating a Facebook Account:
Before you can use Facebook, you must create an account. Creating a Facebook account is free.
- Under the words Sign Up, enter your personal information and desired password.
- Fill out all the fields on the form
- Click Sign Up
- Step 1: You will be able to find your Facebook Friends. To find Friends, enter your email address and click Find Friends. You can also skip this step.
- Step 2:
- If you want, you can add information about your high school, college, employer, city and hometown. Click Save & Continue
- If you don’t want, you can also skip this step.
- Step 3:
- Add a picture of yourself to your Profile. Click Upload a Photo to select a file from your computer, or Take a Photo to take a new photo with your webcam. If you're not ready to add a profile photo, click Skip.
- The Welcome to Facebook page will appear.
- Facebook Home Page:
The Home page displays all of your friends’ recent posts and activities. Whenever your friends update their status, it appears in the News Feed of your Home page.
#6 Messages: When someone sends you a private message
#7 Notifications: When a Friend interacts with you on Facebook, like commenting on your status, tagging you in a picture, or inviting you to an event
#8 Search bar: You can use the Search bar to search for Friends, Fan Pages, Apps, and more.
- The News Feed is a stream of updates from your friends and the fan pages that you have followed
"Like" is a way to appreciate a post.
"Comment" is a way to reply or acknowledge people’s post.
"Share" is a way to ‘redistribute’ people’s post within your network, while still crediting the original user who posted.
#11 To Start a Facebook Chat:
- From the Facebook Home page, locate the Chat box at the bottom-right corner of the screen.
- The Online Friends window will appear with a list of Friends who are currently online and available for Facebook Chat.
- Check your Friend's Chat status.
- A green circle indicates that a Friend is active and available to chat.
- A grey circle indicates that a Friend is idle and may not respond to a chat.
- A Chat window will appear. Type a message and then press Enter. Your conversation will be recorded and appear in the Chat window. \
#12 Facebook Profile Page (Timeline)
Profile page is where you'll share information about yourself. Whenever you post an update, it appears right at your Timeline. Your friends can also share posts on your Timeline.
There are many things that you can share with your Facebook friends: personal updates, photos, links, and more. The things you share will appear on your Timeline and on your Friends' News Feeds.
#13 Add Profile Picture:
Your Profile picture represents you across Facebook.
You can change your Profile picture by placing your cursor over the photo and then click on ‘Add Profile Picture’. #14 Add Cover Photo:
Your Cover Photo is a large picture that is visible only on your Profile page. Unlike your Profile picture, your Cover Photo doesn't have to be a picture of yourself. Instead, you might choose something that expresses your personality or interests.
#15 To Post a Status Update:
- Click ‘Status’ button
- Click ‘Post’ to publish
#16 Uploading Pictures to your Facebook page:
- Click ‘Photo’ button
- Navigate to the folder containing the photos you want to upload
- Click the photo one time (hold down the Ctrl key to select multiple photos)
- Click Open
- Fill out the little form that appears asking you if you want to create a new album (group) for the photos or add to an existing album, change who gets to see the photo, etc.
#17 Conclusion:
This blog is listed under
Digital Media & Games
and E-Commerce
Community
Related Posts:
Post a Comment
You may also be interested in
Share your perspective
Share your achievement or new finding or bring a new tech idea to life. Your IT community is waiting!