Use Tabber Widget for an Attractive Interface
Published on 21 April 15
 Semaphore
0
1
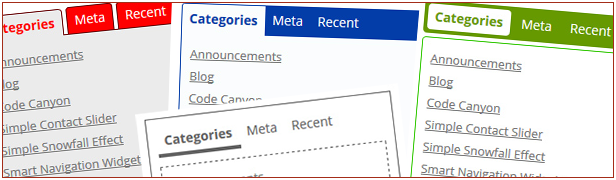
When you want multiple widgets settled along your sidebar, and don’t want them to make it appear crowded, then a Tabber Widget is your best bet. It not only saves space but also manages to give your interface a user friendly appearance.
How Does it Work?
Select a sidebar that you want to use on your website. The tabber widget will automatically work on the sidebar, and convert the different widgets in a tabular format thus saving space. You can even specify a CSS class to add your own styles to it. Whenever this plugin is enabled it will register one extra sidebar. If you want to add sidebars, you need to use the sample code available with this plugin. The tabber widget codes using idTabs in jQuery; the extra CSS helps style the tabber widget.
The basic HTML code that helps create the tabs is as below
<ul>
<li><a href="#widget-1">Widget one</a></li>
<li><a href="#widget-2">Widget two</a></li>
<ul>
<div id="widget-1">
Widget one's content
</div>
<div id="widget-2">
Widget two's content
</div>
<li><a href="#widget-1">Widget one</a></li>
<li><a href="#widget-2">Widget two</a></li>
<ul>
<div id="widget-1">
Widget one's content
</div>
<div id="widget-2">
Widget two's content
</div>
The structure of a typical Wordpress widget is as follows
<div id="widget-1">
<h2>Widget one</h2>
Widget one's content
</div>
<div id="widget-2">
<h2>Widget two</h2>
Widget two's content
</div>
<h2>Widget one</h2>
Widget one's content
</div>
<div id="widget-2">
<h2>Widget two</h2>
Widget two's content
</div>
Using the Tabber Widget, you can convert the Widget, at its output, into a markup that can be used to create a tab. A lot of themes don’t use <div> to register the sidebars, or even worse use complicated markups to identify the sidebars. How can such output be converted into tabular format? The best way to achieve this would be to restructure the intercepted widget output parameters using JS and create an output that can be tabbed using the tabber widget
Now that it is known how this tabber widget works, and the basic structure that is used for this widget, it is time to see how to create and offer this widget at the output
Structure of Demo Plug-in for Tabber
The demo plug-in consists of three basic file types- PHP file, JavaScript file and CSS file. The widget is loaded to the PHP file and this file is also responsible for loading the CSS and JS file.
The demo plug-in
add_action('init', 'd4p_st_init');
add_action('widgets_init', 'd4p_st_widgets_init');
function d4p_st_init() {
register_sidebar(array('name' => 'Tabber Example Sidebar', 'description' => 'Add widgets to this sidebar to use it from Tabber widget.'));
if (!is_admin()) {
$url = plugins_url('d4p-smashing-tabber');
wp_enqueue_script('jquery');
wp_enqueue_script('d4p_st_tabber', $url.'/tabber.js', array('jquery'));
wp_enqueue_style('d4p_st_tabber', $url.'/tabber.css');
}
}
function d4p_st_widgets_init() {
register_widget('d4p_sr_tabber');
}
When the Wordpress is initiated using the init() function, the dp_st_init is also initiated. With this command, a single sidebar is registered. This also queues up the JQuery, JavaScript and CSS files by using the codes- wp_enqueue_script and wp_enqueue_style respectively.
function d4p_st_widgets_init()- when this function is called, it is followed by widget registration
Widget Settings and Modifications
As can be seen in the code above, the tabber widget is located within the d4p_sr_tabber_class
There are two plug-in settings that you will need to take care of when dealing with the tabber widget
1. Sidebar: holds the ID of the sidebar
2. CSS: Used to style the tabber widget by including some extra CSS classes
Note: Don’t include the sidebar that holds the widget. If you want to avoid this, always check whether the selected sidebar and parent sidebar is the same or not.
There is a sample code within the plug-in that allows you to add an extra sidebar easily. Form and update methods are used in order to display the widget’s interface within its panel.
The code used to display
public function widget($args, $instance) {
add_filter('dynamic_sidebar_params', array(&$this, 'widget_sidebar_params'));
extract($args, EXTR_SKIP);
$this->id = $widget_id;
echo $before_widget;
if ($args['id'] != $instance['sidebar']) {
echo '<div id="'.$widget_id.'">';
echo '<ul></ul>';
dynamic_sidebar($instance["sidebar"]);
echo '</div>';
} else {
echo 'Tabber widget is not properly configured.';
}
echo $after_widget;
remove_filter('dynamic_sidebar_params', array(&$this, 'widget_sidebar_params'));
}
With this function add_filter() the rendering parameters of the widget are modified before they are sent out to the output. All the parameters before they are processed to the output are modified to take the format required for a tabber
The dynamic sidebar defined in this code is where the tabbed widgets will be loaded. But, before the dynamic sidebar is given out at the output, it is necessary to check whether the parent and the output sidebars are the same or not.
($args['id'] != $instance['sidebar']) This function in the code helps check for similarity between the two sidebars
The filters are removed before displaying the sidebar at the output; this simply means they are given out without any modification
Modifying the Widget
If you are planning to modify the widget with JavaScript, you need to prepare the widget for this modification
The d4p-tabber-widget class within the code includes an empty <ul> tag which helps in this modification
The filter used for this purpose
public function widget_sidebar_params($params) {
$params[0]['before_widget'] = '<div id="'.$params[0]['widget_id'].'">';
$params[0]['after_widget'] = '</div>';
$params[0]['before_title'] = '<a href="#">';
$params[0]['after_title'] = '</a>';
return $params;}
$params[0]['before_widget'] = '<div id="'.$params[0]['widget_id'].'">';
$params[0]['after_widget'] = '</div>';
$params[0]['before_title'] = '<a href="#">';
$params[0]['after_title'] = '</a>';
return $params;}
The output parameters will take the format required by the sidebar widget at the output. Though this process is good to go, you will need JavaScript to remove the empty <ul> tag.
<div id="widget-1">
<a href="#">Widget one</a>
Widget one's content
</div>
<a href="#">Widget one</a>
Widget one's content
</div>
The output will appear as above in case you use the filter defined here
Modification Using JavaScript
Now that most of the work is done, let’s transform the widgets into tabs and complete the modification using JavaScript
Modification Using JavaScript
Now that most of the work is done, let’s transform the widgets into tabs and complete the modification using JavaScript
jQuery(document).ready(function(){
jQuery(".d4p-tabber-widget").each(function(){
var ul = jQuery(this).find("ul.d4p-tabber-header");
jQuery(this).children("div.d4p-st-tab").each(function() {
var widget = jQuery(this).attr("id");
jQuery(this).find('a.d4p-st-title').attr("href", "#" + widget).wrap('<li></li>').parent().detach().appendTo(ul);
});
jQuery(this).idTabs();
});
});
jQuery(this).children("div.d4p-st-tab").each(function() this function in the code helps identify all the individual widgets to be included in the tabber widget.
var widget = jQuery(this).attr("id") this function helps get the widget ID for the different tabs on the tabber widget
In this code- jQuery(this).find('a.d4p-st-title').attr("href", "#" + widget).wrap('<li></li>').parent().detach().appendTo(ul); the href attribute for the element <a> is set to the widget id, which is later wrapped inside the </li> element and finally it is removed from its present location and added the empty </ul> location
Once this whole function performs the action, enable idTabs which activates the Tab controls. Use the default styling to see how the tabber widget would actually appear at the output
Install the Plug-in
You will first need to upload the plug-in to the Wordpress plug-in folder and activate it from there. When you visit the widgets panel on your Wordpress admin panel, you will see the tabber example sidebar along with the D4P Smashing Tabber in the available widgets column. You will need to drag drop the new tabber to your main sidebar. How? You just need to select the tabber you want in the main sidebar, which in this case is the tabber example sidebar, using the dropdown, and save the new settings. You will need to add the widgets you want displayed on this sidebar by selecting them individually. Save the changes you have made, and you are ready to go!
Conclusion
With this widget, you can display several widgets while saving space on your Wordpress website. Creating this widget, as you can see for yourself, is pretty easy. The only thing you need to keep in mind is that your parent widget and the widget you are trying to display should not be the same. Also you will need to transform the output using JavaScript for proper display. The pro of using this widget is giving your website an excellent interface.
Note: Take a complete backup of your Wordpress website before you start with coding this tabber widget.
Author Bio:
Deepa is a passionate blogger associated with Semaphore Software Company., a leading Offshore WordPress development company. She loves sharing information regarding WordPress tips & tricks. If you are looking to Offshore Wordpress Developers then just get in touch with her.
This blog is listed under
Open Source
, Development & Implementations
, Operating Systems
and Digital Media & Games
Community
Related Posts:
Post a Comment
You may also be interested in
Share your perspective

Share your achievement or new finding or bring a new tech idea to life. Your IT community is waiting!


