How to Craft Email Newsletters for WordPress?
Published on 05 May 15
 Semaphore
0
1

Email marketing is in vogue! If you are not doing enough of this, you are certainly not leveraging the capabilities offered by this tool. With tools like MailChimp it is easy to send Email newsletters to your potential and existing consumers and connect with them. You can connect with them through daily newsletters or weekly newsletters, depending on their subscriptions. The question is how to segregate the two when using Email Newsletters through your Wordpress website.
Build a List
The first step to potential email marketing is building an email list. The list helps you target the audience better. There will be users who subscribe to daily newsletters, but there are those who don't want to receive your newsletters on a daily basis. You will need to offer them an option of weekly newsletters, so that you don't lose out on those subscriptions. Segmenting and grouping your user list is very important to direct email marketing campaigns. The real question is how to build this list?
Let's say you have an account with MailChimp. You will need to login to your Mailchimp account and go to lists. You will see your lists being displayed. Go to Groups>View Group Options here.
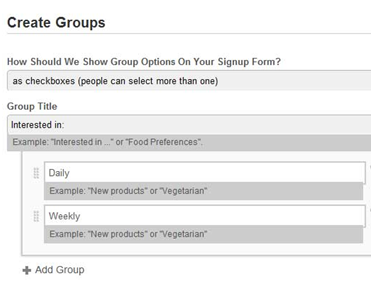
A screen will be displayed as below. You can choose the options for the list. For the sake of simplicity, here only two options will be considered- daily and weekly. Work out the group titles, and save the settings.
Go back to lists, and select forms here. You will see a signup form. You can customize it and add the details that you want your audience to view in this form. You can have the update preference embedded to this form along with checkboxes placed next to it. Your user can choose the option they would like to go with i.e. daily or weekly.
Go back to the lists. You will see an icon "for your website". Click on signup form embed code here to generate an embed code.
There are three types of forms that you can generate code for- super slim form, classic form, and naked form. Let's choose naked form. If you don't want to give a title to your form, make sure you don't check the option. Just check the option to add interest fields to your form. Once you have changed all the settings for your form, click on the button that says "create embed code". A code similar to the one given below will be generated
You can copy-paste this code to your site. The location of the code depends on where you want to position your form. In this case, the code will be pasted in the sidebar.php file.
<!-Begin Mailchimp Signup Form -- >
<div id="mc_embed_signup">
<form action=http://list25.us1.list-manage1.com/subscribe/post?u=549b83cc2 method=post" id="mc-embedded-subscribe-form" name="mc-embedded-subs novalidate>
<div class ="mc-field-group">
<label for = "mce-EMAIL">Email Address</label>
<input type= "email" value= "" name= "EMAIL" class= "required email" id= "mc"
Now that you have pasted the code, you will need to remove all styling parameters. Just keep the basic form fields.
<formaction="http://list25.us1.list-manage.com/subscribe/post?u=549b83cc29ff23c36e5796c38&id=184bf03dd3" method="post"id="mc-embedded-subscribe-form" name="mc-embedded-subscribe-form" class="validate" target="_blank">
<input type="email" value="" name="EMAIL" class="required email" id="mce-EMAIL">
<input type="submit" value="Subscribe" name="subscribe"id="mc-embedded-subscribe" class="button" />
<input type="checkbox" checked="checked" value="1"name="group[9][1]" id="mce-group[9]-9-0">
<label for="mce-group[9]-9-0">List25 Daily</label>
<input type="checkbox" checked="checked" value="2"name="group[9][2]" id="mce-group[9]-9-1">
<label for="mce-group[9]-9-1">List25 Weekly</label>
</form>
The submit button has been positioned immediately after the input field for email. The label for email as well as error fields has been removed in this new form for subscriptions. The next thing you need to do is explain what value is to be entered in the blank space given for Email as it does not have a title. Use the onblur and onfocus values for this purpose. The below code will help you replace the original email input field.
<input type="text" value="Enter your email..." onblur="if (this.value == '') {this.value = 'Enter your email...';}" onfocus="if (this.value == 'Enter your email...') {this.value = '';}" name="EMAIL" class="required email emailupdatesinput"id="mce-EMAIL" />
With the code, the "Enter your Email" text will appear next to the blank input field. This text will disappear when the user clicks on the input field to enter their Email address thus making the form look neat and clean.
Let's customize the form with some add-on classes
<form action="http://list25.us1.list-manage.com/subscribe/post?u=549b83cc29ff23c36e5796c38&id=184bf03dd3" method="post"id="mc-embedded-subscribe-form" name="mc-embedded-subscribe-form" class="validate" target="_blank">
<div class="subscribe">
<input type="text" value="Enter your email..." onblur="if (this.value == '') {this.value = 'Enter your email...';}" onfocus="if (this.value == 'Enter your email...') {this.value = '';}" name="EMAIL" class="required email emailupdatesinput"id="mce-EMAIL" />
<input type="submit" value="Subscribe" name="subscribe"id="mc-embedded-subscribe" class="button subscribesubmitbutton" />
<div class="clear"></div>
<div class="subscribecheckboxes">
<input type="checkbox" checked="checked" value="1"name="group[9][1]" id="mce-group[9]-9-0">
<label for="mce-group[9]-9-0">List25 Daily</label>
<input type="checkbox" checked="checked" value="2"name="group[9][2]" id="mce-group[9]-9-1"class="secondcheckbox">
<label for="mce-group[9]-9-1">List25 Weekly</label>
</div>
</div>
</form>
For all the additional divs added to the form, an additional class has been added. With this done, you will need to add the styling sheets for the form.
.subscribe { width: 296px; height: 38px; border: solid#bbbbbb 1px; margin: 0 0 60px 0;}
.subscribecheckboxes {margin: 20px 0 0 0; font-family:'theme font', sans-serif; font-
size: 14px; color:#626262;}
.secondcheckbox {margin: 0 0 0 28px;}
.emailupdatesinput { width: 162px; height: 38px; border:none; font-family: Georgia, serif; font-size: 14px; font-style: italic; color: #949494; padding: 0 10px 0 10px; float:left;}
.subscribesubmitbutton { background: #ff370f; height: 40px;border: none; width: 115px; margin: -1px -60px 0 0; float:left; font-family: 'ProximaNovaRegular', sans-serif; font-size: 12px; color: #ffffff; text-transform: uppercase;padding: 0 1px 0 0; cursor: pointer;}
With the style sheets added, you are ready to create the campaign for the two different groups. To create campaigns, the RSS driven campaigns will be used. Go to create campaigns>RSS driven campaigns. Follow the steps mentioned here to create the campaign. With this step performed, you are ready to go live with your form.
Conclusion
With forms that target diverse groups of people, you can gain more conversions for your website. It is easy to create a form with MailChimp and integrate it to Wordpress. Remember, it is always good to have a clean form that is crisp with details and has decent amount of white space.
Related Posts:
Email marketing
WordPress
Post a Comment
You may also be interested in
Share your perspective

Share your achievement or new finding or bring a new tech idea to life. Your IT community is waiting!


