MyPage is a personalized page based on your interests.The page is customized to help you to find content that matters you the most.


I'm not curious

esProc Getting Started: Basic Usage of JDBC

Published on 15 October 14
0
0

esProc can be embedded into Java program. So the latter can call the cellset program written in esProc using a way of connection such as JDBC. The method of calling the esProc program is the same as that of calling the stored procedure. The following is a brief introduction to esProc JDBC.

1. Description of the jars of esProc JDBC

esProc JDBC is like an incomplete database JDBC driver without physical tables. It can be regarded simply as a database that only supports the stored procedure. In addition, itisa built-in computing engine, thus no standalone servers are needed.

esProc JDBC has five basic jars, which are all situated in \esProc\ lib in installation directory:

dm.jar esProc computing engine and JDBC driver

poi-3.7-20101029.jar process the access of Excel files

log4j_128.jar process logs

icu4j_3_4_5.jar handle internationalization

dom4j-1.6.1.jar parse the configuration files

If other databases are to be used as the datasources of esProc JDBC, then the driver jars of these databases are required to be in place. For example, hsqldb.jar is necessary to use the demo database. Please note the esProc JDBC requires JDK1.6 or higher versions.

2. Basic usage of esProc JDBC

In the cellset code, the result set is returned by result statement.
esProc Getting Started: Basic Usage of JDBC - Image 1

In the application code, arg1 is a cellset parameter. This dfx file will be named as test.dfx.

Note: The result set ofdfxis returned by result statement. When dfx is called, the parameter names that receive the parameters won’t be used; the values of parameters will be assigned according to their order instead.

1) Load the jars to be used. Load the basic jars of esProc JDBC mentioned above while launching the Java application. These jars can be put in the directory of WEB-INF/libunder a web application.

2) Deploy dfxConfig.xml, config.xml and the dfx file

Prepare file config.xml, which contains the basic configuration information of esProc, such as registration code, searching path, datasource configuration, etc. The file can be found in the path esProc\configin esProc’s installation directory. The information in it is the same as that set in the esProc Option page. The configuration is allowed to be adjusted before deployment (like modifying the Searching path which is used to search the dfx file):
esProc Getting Started: Basic Usage of JDBC - Image 2
Or the datasources necessary for dfxcan be configured in the Data Source Explorer:
esProc Getting Started: Basic Usage of JDBC - Image 3

After the modification, config.xml and dfxConfig.xml, which are situated in esProc\classes in the esProc’s installation directory, will be saved in the class path of the application that will use them.

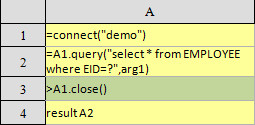
Put the test.dfx created in Step 1 in the class path of the application, or put it in the path specified by file dfxConfig.xml’s<paths/> node (i.e. the above-mentioned Searching path).

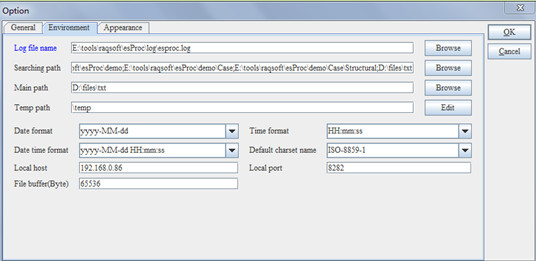
1) Further configure file dfxConfig.xml manually if necessary. For detailed operation, please refer to related documents. Please note the name of configured file should still be dfxConfig.xml and must not be changed.

2) Call dfx in Java program.

publicvoid testDataServer(){

Connection con = null;

com.esproc.jdbc.InternalCStatementst;

com.esproc.jdbc.InternalCStatement st2;

try{

//create a connection

Class.forName("com.esproc.jdbc.InternalDriver");

con= DriverManager.getConnection("jdbc:esproc:local://");

//call the stored procedure in which test is the name of dfx file

st =(com.esproc.jdbc.InternalCStatement)con.prepareCall("calltest(?)");

//set the parameters

st.setObject(1,"3");

//the result obtained by executing the following code is the same as that obtained using the above calling method

st =(com.esproc.jdbc.InternalCStatement)con.prepareCall("call test(3)");

//execute the stored procedure

st.execute();

//get result set

ResultSet set = st.getResultSet();

}

catch(Exception e){

System.out.println(e);

}

finally{

//close the connection

if (con!=null) {

try {

con.close();

}

catch(Exception e) {

System.out.println(e);

}

}

}

}

To know more about calling methods and configuration, please refer to documents that cover a more in-depth discussion at this point.
This blog is listed under Development & Implementations and Data & Information Management Community

Post a Comment

Please notify me the replies via email.

Important:
  • We hope the conversations that take place on MyTechLogy.com will be constructive and thought-provoking.
  • To ensure the quality of the discussion, our moderators may review/edit the comments for clarity and relevance.
  • Comments that are promotional, mean-spirited, or off-topic may be deleted per the moderators' judgment.
You may also be interested in
 
Awards & Accolades for MyTechLogy
Winner of
REDHERRING
Top 100 Asia
Finalist at SiTF Awards 2014 under the category Best Social & Community Product
Finalist at HR Vendor of the Year 2015 Awards under the category Best Learning Management System
Finalist at HR Vendor of the Year 2015 Awards under the category Best Talent Management Software
Hidden Image Url

Back to Top