JSON Web Token Tutorial: An Example in Laravel and AngularJS
With the rising popularity of single page applications, mobile applications, and RESTful API services, the way web developers write back-end code has changed significantly. With technologies like AngularJS and BackboneJS, we are no longer spending much time building markup,
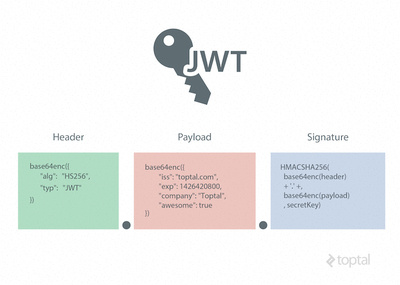
A JSON Web Token, or JWT, is used to send information that can be verified and trusted by means of a digital signature. It comprises a compact and URL-safe JSON object, which is cryptographically signed to verify its authenticity, and which can also be encrypted if the payload contains sensitive information.
Because ofAuthorization headers or URL query parameters. 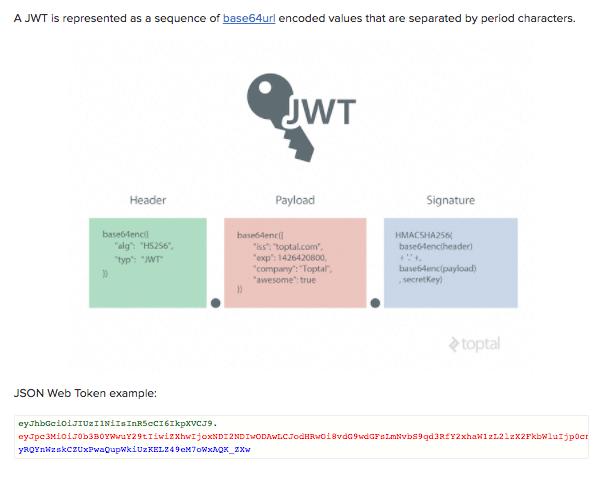

In the context of JWT, a claim can be defined as a statement about an entity (typically, the user), as well as additional meta data about the token itself. The claim contains the information we want to transmit, and that the server can use to properly handle authentication. There are multiple claims we can provide; these include registered claim names, public claim names and private claim names.
Registered Claims
These are the claims that are registered in the IANA JSON Web Token Claims registry. These claims are not intended to be mandatory but rather to provide a starting point for a set of useful, interoperable claims.
These include:
iss : The issuer of the token- sub: The subject of the token
aud : The audience of the tokenexp : Token expiration time defined in Unix timenbf : Not before time that identifies the time before which the JWT must not be accepted for processingiat : Issued at time, in Unix time, at which the token was issuedjti : JWT ID claim provides a unique identifier for the JWT
Public Claims
Public claims need to have collision-resistant names. By making the name a URI or URN naming collisions are avoided for JWTs where the sender and receiver are not part of a closed network.
An example of a public claim name could https://www.toptal.com/jwt_claims/is_admin
Private Claims
Private claim-names may be used in places where JWTs are only exchanged in a closed environment between known systems, such as inside an enterprise. These are claims that we can define ourselves, like user IDs, user roles, or any other information.
Using claim-names that might have conflicting semantic meanings outside of a closed or private system are subject to
It is important to note that we want to keep a web token as small as possible, so use only necessary data inside public and private claims.
Example Payload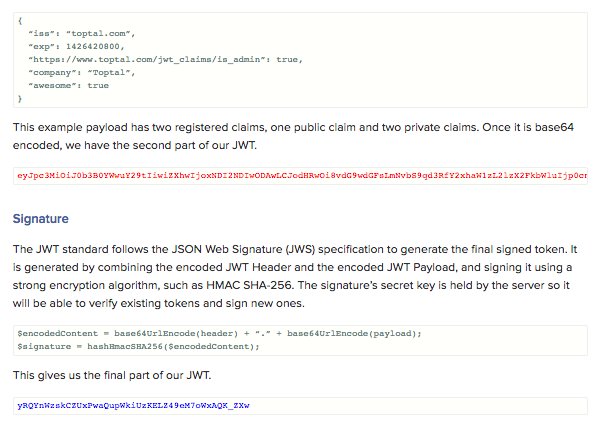
It is critical to use TLS/SSL in conjunction with JWT, to prevent man-in-the-middle attacks. In most cases, this will be sufficient to encrypt the JWT payload if it contains sensitive information. However, if we want to add an additional layer of protection, we can encrypt the JWT payload itself using the JSON Web Encryption (JWE) specification.
Of course, if we want to avoid the additional overhead of using JWE, another option is to simply keep sensitive information in our database, and use our token for additional API calls to the server whenever we need to access sensitive data.
Why the Need for Web Tokens?
Before we can see all the benefits of using token authentication, we have to look at the way authentication has been done in the past.
Server-Based Authentication
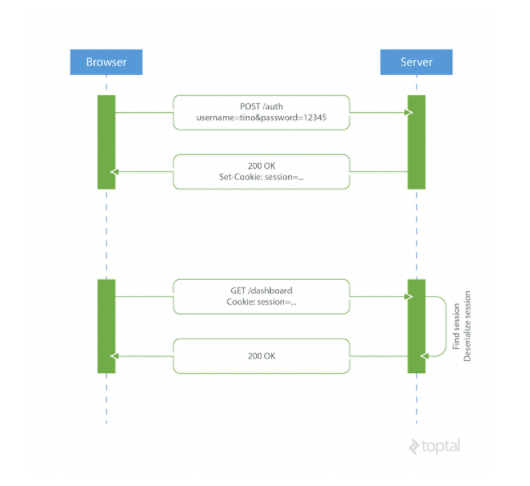
Because the HTTP protocol is stateless, there needs to be a mechanism for storing user information and a way to authenticate the user on every subsequent request after login. Most websites use cookies for storing user’s session ID.
How it Works
The browser makes a POST request to the server that contains the user’s identification and password. The server responds with a cookie, which is set on the user’s
On every subsequent request, the server needs to find that session and deserialize it, because user data is stored on the server.
Drawbacks of Server-Based Authentication
Hard to scale: The server needs to create a session for a user and persist it somewhere on the server. This can be done in memory or in a database. If we have a distributed system, we have to make sure that we use a separate session storage that is not coupled to the application server.
Cross-origin request sharing (CORS): When using AJAX calls to fetch a resource from another domain (cross-origin) we could run into problems with forbidden requests because, by default, HTTP requests don’t include cookies on cross-origin requests.
Coupling with the web framework: When using server-based authentication we are tied to our framework’s authentication scheme. It is really hard, or even impossible, to share session data between different web frameworks written in different programming languages.
Token-Based Authentication
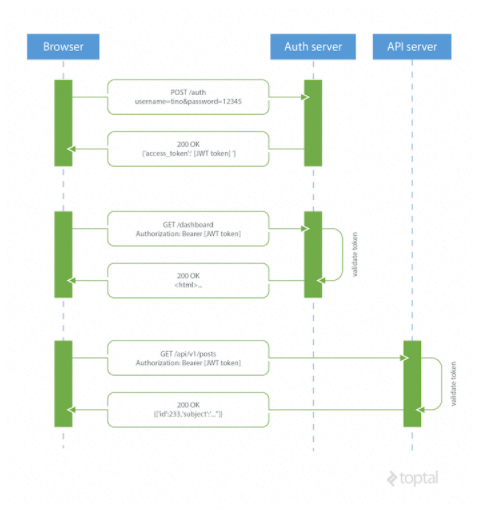
Token based authentication is stateless, so there is no need to store user information in the session. This gives us the ability to scale our application without worrying where the user has logged in. We can easily use the same token for fetching a secure resource from a domain other than the one we are logged in to.
How JSON Web Tokens Work
A browser or mobile client makes a request to the authentication server containing user login information. The authentication server generates a new JWT access token and returns it to the client. On every request to a restricted resource, the client sends the access token in the query string or Authorization header. The server then validates the token and, if it’s valid, returns the secure resource to the client.
Stateless, easier to scale: The token contains all the information to identify the user, eliminating the need for the session state. If we use a load balancer, we can pass the user to any server, instead of being bound to the same server we logged in on.
Reusability: We can have many separate servers, running on multiple platforms and domains, reusing the same token for authenticating the user. It is easy to build an application that shares permissions with another application.
Security: Since we are not using cookies, we don’t have to protect against cross-site request forgery (CSRF) attacks. We should still encrypt our tokens using JWE if we have to put any sensitive information in them, and transmit our tokens over HTTPS to prevent man-in-the-middle attacks.
Performance: There is noIn this tutorial I am going to demonstrate how to implement the basic authentication using JSON Web Tokens in two popular web technologies: Laravel 5 for the backend code and AngularJS for the
This JSON web token example will not use any kind of encryption to ensure the confidentiality of the information transmitted in the claims. In
Laravel Backend Example
We will use Laravel to handle user registration, persisting user data to a database and providing some restricted data that needs authentication for the Angular app to consume. We will create an example API subdomain to simulate Cross-origin resource sharing (CORS) as well.
Installation and Project Bootstrapping
In order to use Laravel, we have to install the Composer package manager on our machine. When developing in Laravel I recommend using the Laravel Homestead pre-packaged box of Vagrant. It provides us with a complete development environment regardless of our operating system.
The easiest way to bootstrap our Laravel application is to use a Composer package Laravel Installer.
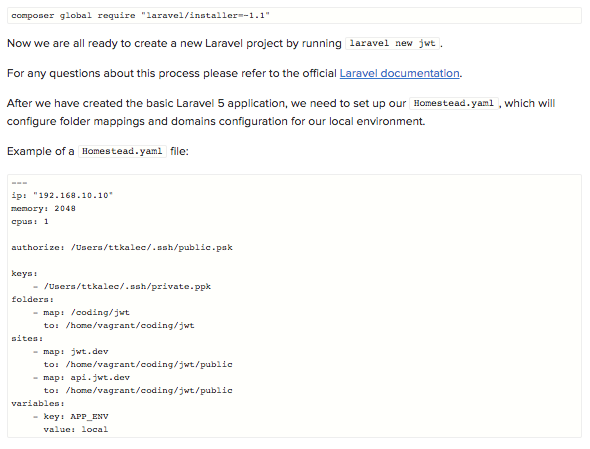
After we’ve booted up our Vagrant box with vagrant upvagrant ssh/home/vagrant/coding/jwtphp artisan migrate
Installing Composer Dependencies
Fortunately, there is a community of developers working on Laravel and maintaining many great packages that we can reuse and extend our application with. In this tymon/jwt-authbarryvdh/laravel-cors
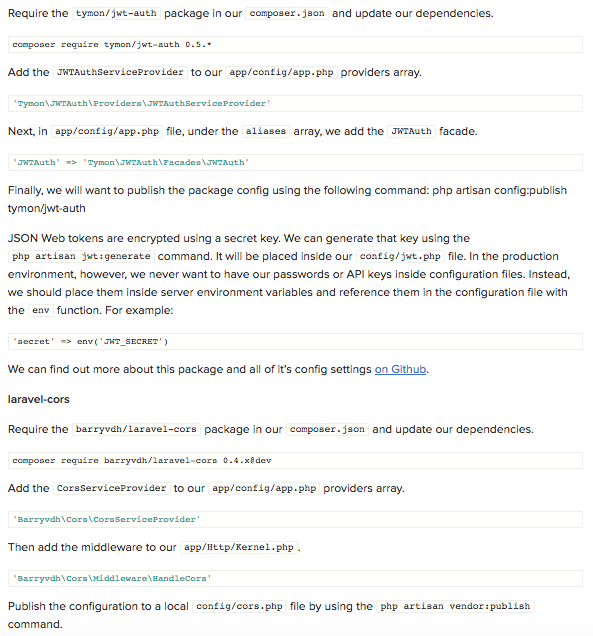
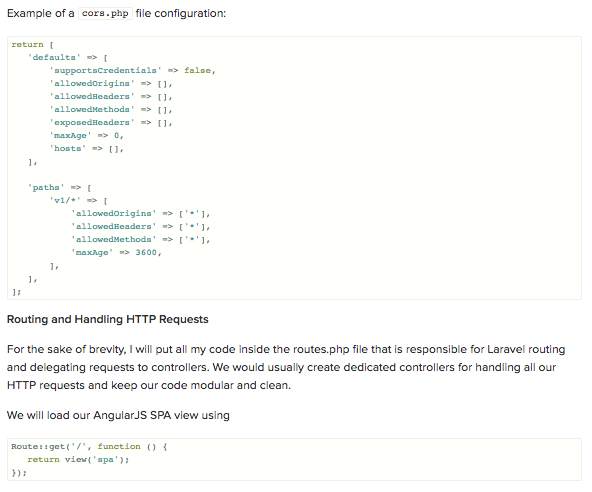
POST request /signup
/restrictedAuthorization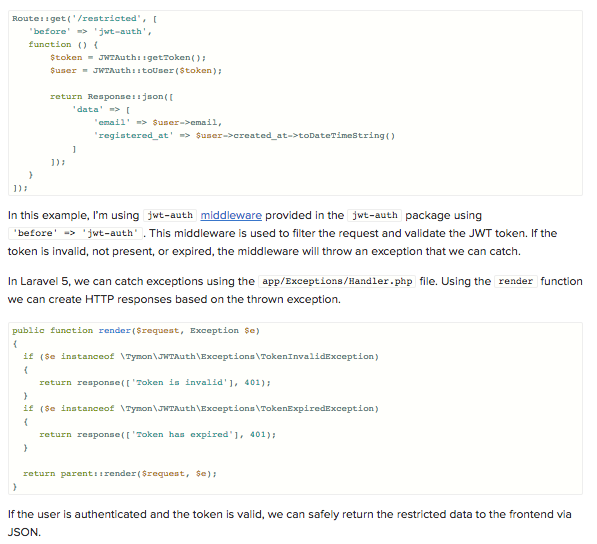
jwt-authPOST request to an API api.jwt.dev/v1/restrictedconfig/cors.php
We are using AngularJS as a front-end, relying on the API calls to the Laravel back-end authentication server for user authentication and sample data, plus the API server for cross-origin example data. Once we go to the homepage of our project, the backend will serve resources/views/spa.blade.php
Here is the folder structure of the Angular app:
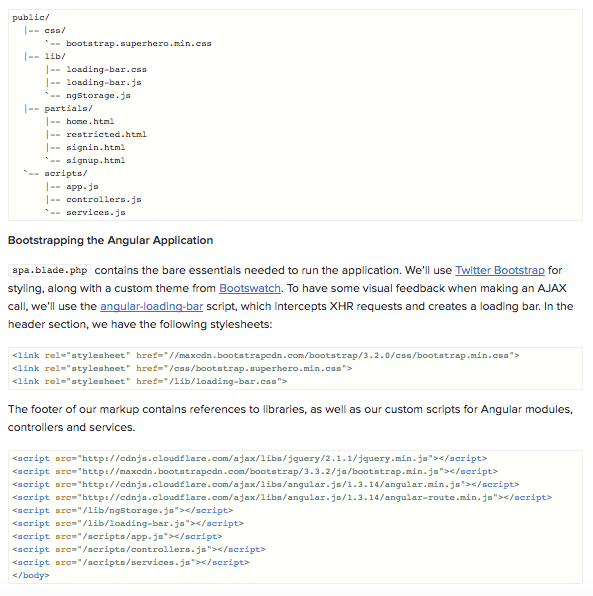
We are ngStorageAuthorization
In the production environment, of course, we would minify and combine all our script files and stylesheets in order to improve performance.
I’ve created a navigation bar using Bootstrap that will change the visibility of appropriate links, depending on the sign-in status of the user. The sign-in status is determined by the presence of atoken variable in the controller’s scope. 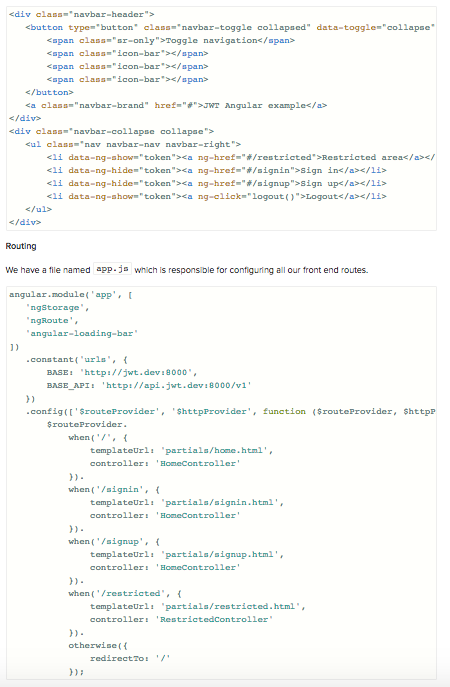
controllers.jsHomeController RestrictedControllerHomeController handles sign-in, sign-up and logout functionality. It passes the username and password data from the sign-in and sign-up forms to Auth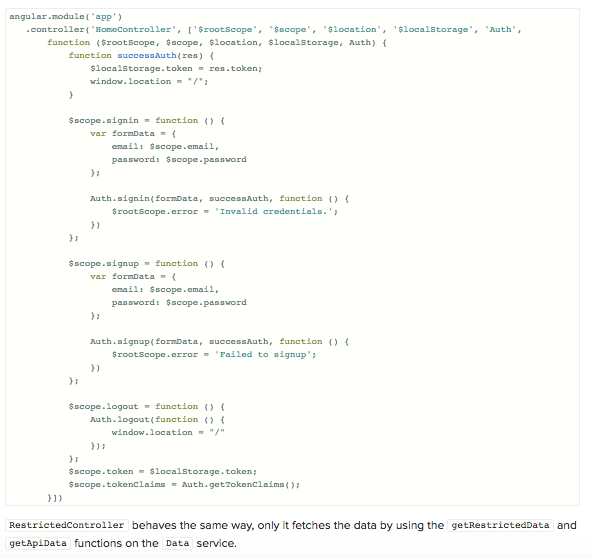

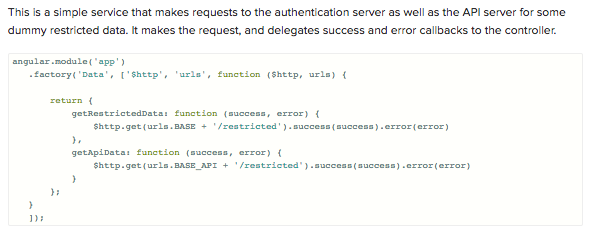
The backend is responsible for serving the restricted data only if the user is authenticated. This means that in order to respond with the restricted data, the request for that data needs to contain a valid JWT inside Authorization
tokenClaims variable. This is passed to the controller via getTokenClaims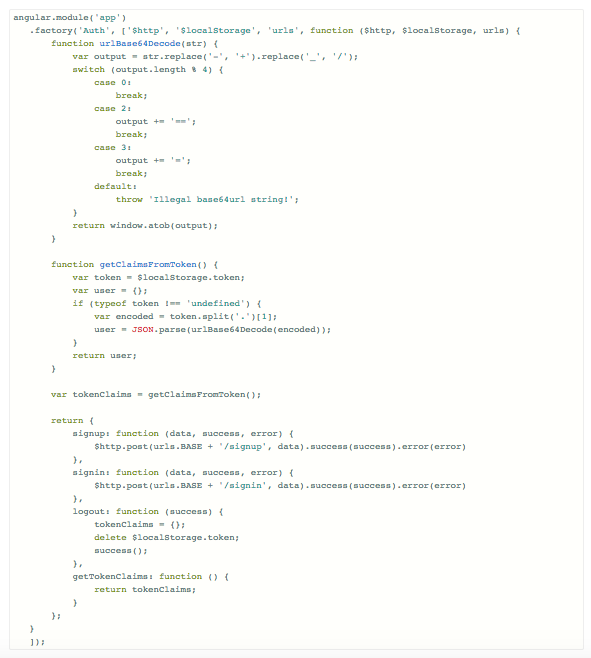
Token-based authentication enables us to construct decoupled systems that are not tied to a particular authentication scheme. The token might be generated anywhere and consumed on any system that uses the same secret key for signing the token. They are mobile
JSON Web Tokens work across all popular programming languages and are quickly gaining in popularity. They are backed by companies like Google,


 Michelle


